12 Grab And Go Snacks for Lake Days: Easy Summer Food Ideas!
1. Turkey And Cheese Roll Ups
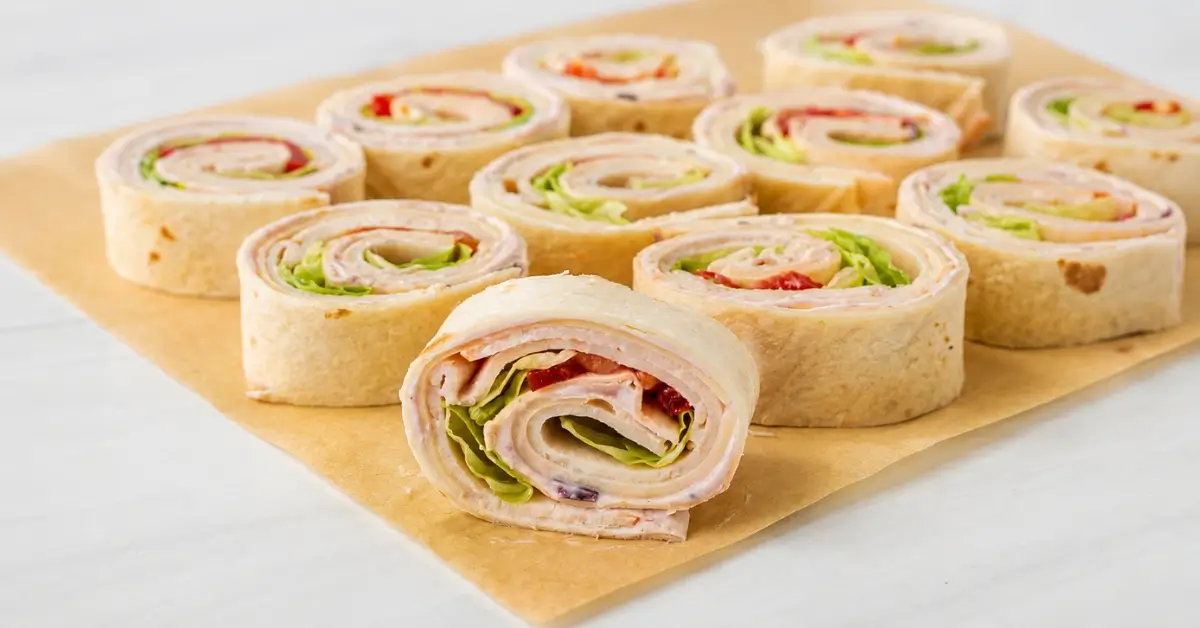
Ingredients
Main Ingredients
- 8 medium flour tortillas, about 8 inches each.
- 8 ounces sliced deli turkey, thinly sliced.
- 8 ounces cream cheese, softened to room temperature.
- 8 slices cheddar cheese, about 1 ounce each.
- 1 cup baby spinach, washed and thoroughly dried.
- 2 tablespoons mayonnaise.
- 1 tablespoon Dijon mustard.
- 1/4 teaspoon garlic powder.
- 1/4 teaspoon black pepper.
Optional Ingredients
- 1/4 cup finely chopped green onions.
- 1/4 cup finely chopped red bell pepper.
- 1/4 cup shredded lettuce.
- 2 tablespoons chopped fresh parsley.
- 1/4 teaspoon smoked paprika.
- A few thin pickle slices.
Ingredient Substitutions
- Turkey: Use sliced chicken, ham, or roast beef if preferred.
- Cheddar cheese: Try Swiss, provolone, Monterey Jack, pepper Jack, or Colby Jack.
- Cream cheese: Neufchatel cheese or whipped cream cheese can be used.
- Flour tortillas: Whole-wheat tortillas work well for a heartier option.
- Dijon mustard: Yellow mustard can be substituted for a milder flavor.
- Spinach: Use finely shredded romaine or iceberg lettuce instead.
- Mayonnaise: Greek yogurt can be used for a lighter spread.
Equipment Needed
- Large cutting board.
- Small mixing bowl.
- Butter knife or small spatula.
- Measuring spoons.
- Measuring cups.
- Sharp chef’s knife or serrated knife.
- Paper towels or clean kitchen towel.
- Plastic wrap or airtight container for storage.
Step-by-Step Instructions
Step 1: Soften the Cream Cheese
Take the cream cheese out of the refrigerator and let it soften at room temperature for about 15–20 minutes.
Soft cream cheese should be easy to spread without tearing the tortillas.
Don’t try to spread very cold cream cheese directly onto the tortillas. It can drag across the tortilla and create holes.
Step 2: Make the Creamy Spread
Add the softened cream cheese, mayonnaise, Dijon mustard, garlic powder, and black pepper to a small mixing bowl.
Stir until the mixture is smooth and evenly combined.
The finished spread should look creamy with no large lumps of cream cheese remaining.
If you’re adding green onions, parsley, or smoked paprika, stir them in now.
Step 3: Prepare the Tortillas
Place one flour tortilla flat on a clean cutting board.
If the tortillas feel stiff or dry, warm them for about 10–15 seconds in the microwave. This makes them more flexible and easier to roll.
Don’t overheat them. The tortilla should be soft and pliable, not hot.
Step 4: Spread the Cream Cheese Mixture
Spread about 2 tablespoons of the cream cheese mixture evenly over the tortilla.
Leave about 1/2 inch of space around the edges.
Keeping the layer fairly thin is important. Too much filling can make the roll ups difficult to close and more likely to fall apart.
Step 5: Add the Turkey and Cheese
Place about 1 ounce of sliced turkey evenly over the cream cheese layer.
Add 1 slice of cheese on top of the turkey.
Try to distribute the turkey and cheese from edge to edge without creating a very thick pile in the center.
Step 6: Add the Vegetables
Place a small amount of baby spinach over the turkey and cheese.
If using lettuce, bell peppers, or pickles, add them now.
Make sure the vegetables are dry. Excess moisture can make the tortillas soggy.
Step 7: Roll the Tortilla Tightly
Start at one edge of the tortilla and roll it firmly over the filling.
As you roll, gently tuck the filling inward and keep the tortilla tight.
Continue rolling until you have a compact cylinder.
The finished roll should feel firm and hold its shape without large gaps between the tortilla and filling.
Step 8: Chill the Roll Ups
For the cleanest slices, wrap each roll tightly in plastic wrap and refrigerate for 15–30 minutes.
Chilling isn’t required, but it helps the cream cheese firm up and makes slicing much easier.
For meal prep, you can refrigerate the wrapped roll ups for several hours before serving.
Step 9: Slice and Serve
Use a sharp knife to trim off the uneven ends if desired.
Cut each roll into 1-inch pieces.
Wipe the knife between cuts if the filling starts sticking to the blade.
Arrange the Turkey And Cheese Roll Ups on a serving platter and serve immediately.
They are delicious cold or slightly chilled.
Nutrition Facts
Cost To Make This Recipe
Item – Estimated Cost (USD).
Flour tortillas – $2.25.
Deli turkey – $4.50.
Cream cheese – $2.25.
Cheddar cheese – $1.70.
Baby spinach – $0.75.
Mayonnaise – $0.20.
Dijon mustard – $0.15.
Garlic powder – $0.05.
Black pepper – $0.05.
Estimated Total Recipe Cost
Approximately $11.90 USD.
Estimated Cost Per Serving
Approximately $1.49 USD per serving.
2. Watermelon Feta Skewers
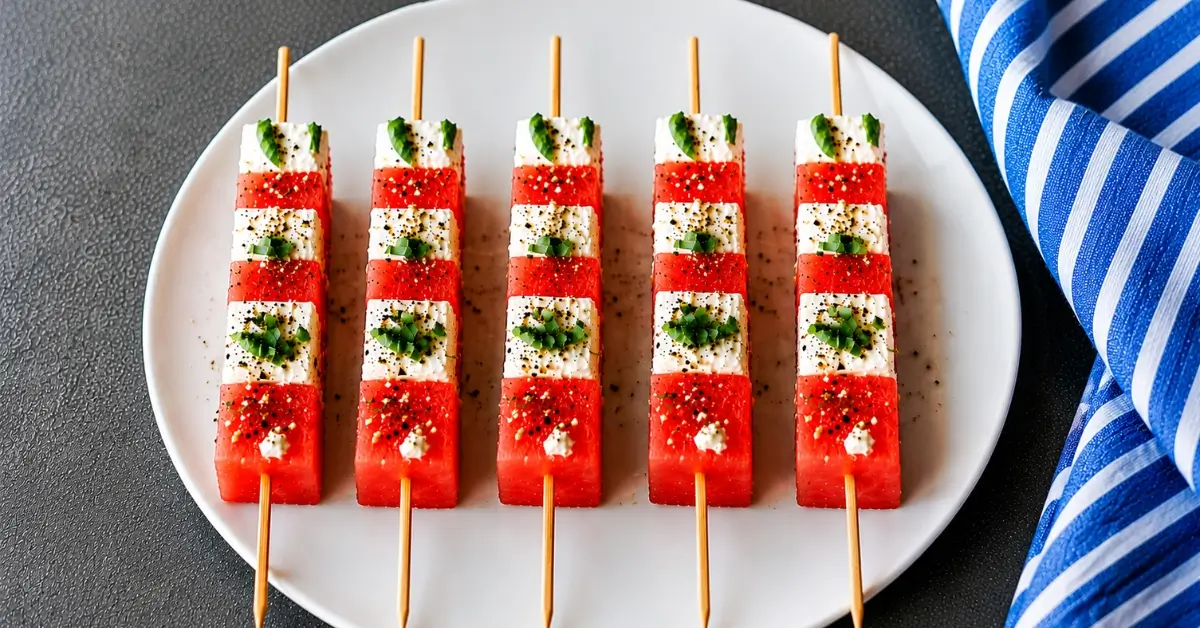
Ingredients
Main Ingredients
- 4 cups seedless watermelon, cut into 1-inch cubes.
- 8 ounces feta cheese, cut into 1-inch cubes.
- 1/2 cup fresh mint leaves.
- 2 tablespoons extra-virgin olive oil.
- 1 tablespoon fresh lime juice.
- 1/4 teaspoon kosher salt.
- 1/4 teaspoon freshly ground black pepper.
- 2 tablespoons balsamic glaze, for drizzling.
Optional Ingredients
- 1 tablespoon honey, for a sweeter flavor.
- 1/4 teaspoon red pepper flakes, for a little heat.
- 1 tablespoon finely chopped fresh basil, for extra herbal flavor.
- 1 tablespoon toasted pistachios, finely chopped, for crunch.
Ingredient Substitutions
- Feta: Use goat cheese or small fresh mozzarella balls if you prefer a milder cheese.
- Mint: Fresh basil works well when mint is unavailable.
- Lime juice: Substitute fresh lemon juice.
- Balsamic glaze: Use a light drizzle of regular balsamic vinegar, although the glaze gives the skewers a thicker, sweeter finish.
- Watermelon: Choose a ripe, seedless watermelon for the best texture and easiest preparation.
Equipment Needed
- Large cutting board.
- Sharp chef’s knife.
- Small mixing bowl.
- Small whisk or fork.
- Measuring cups.
- Measuring spoons.
- Serving platter.
- 20 to 24 small wooden or bamboo skewers.
- Paper towels.
Step-by-Step Instructions
Step 1: Prepare the Watermelon
Cut the watermelon into approximately 1-inch cubes.
Pat the watermelon gently with paper towels to remove excess surface moisture.
The pieces should be firm enough to hold their shape when threaded onto the skewers.
Avoid cutting the watermelon too small. Larger pieces are easier to skewer and give each bite a better balance of fruit and cheese.
Step 2: Cut the Feta
Cut the feta into cubes roughly the same size as the watermelon.
If your feta is very soft or crumbly, chill it for 10 to 15 minutes before cutting. Slightly chilled feta is easier to handle.
For the best presentation, try to keep the watermelon and feta pieces similar in size.
Step 3: Make the Simple Dressing
Add the olive oil, fresh lime juice, kosher salt, and black pepper to a small bowl.
Whisk with a fork until the ingredients are combined.
If you’re using honey, add it now and whisk until smooth.
The finished dressing should taste bright, lightly salty, and slightly tangy.
Step 4: Assemble the Skewers
Thread the ingredients onto each skewer in this order.
One watermelon cube.
One mint leaf.
One feta cube.
Another watermelon cube.
Repeat the pattern until all the ingredients are used.
You can fold larger mint leaves in half before threading them onto the skewer.
The finished skewers should look colorful and balanced, with the red watermelon, white feta, and green mint clearly visible.
Step 5: Arrange on a Serving Platter
Place the completed skewers on a large serving platter in a single layer.
Try not to stack them too heavily because the watermelon can release juice as it sits.
Step 6: Add the Dressing
Lightly drizzle the olive oil and lime dressing over the assembled skewers.
Finish with the balsamic glaze.
If you’re adding pistachios, sprinkle them over the top just before serving.
Don’t overdo the dressing. Watermelon already contains plenty of moisture, so a light drizzle is enough.
Step 7: Chill and Serve
For the freshest flavor, refrigerate the skewers for about 15 to 20 minutes before serving.
Serve them cold or slightly chilled.
There is no oven, stovetop, or cooking temperature required for this recipe.
For the best texture, enjoy the skewers within a few hours of assembling them.
Nutrition Facts
Cost To Make This Recipe
Item – Estimated Cost (USD).
Seedless watermelon, 4 cups – $3.00.
Feta cheese, 8 oz – $4.00.
Fresh mint, 1/2 cup – $2.00.
Extra-virgin olive oil, 2 tbsp – $0.35.
Fresh lime juice, 1 tbsp – $0.30.
Kosher salt, 1/4 tsp – $0.05.
Black pepper, 1/4 tsp – $0.10.
Balsamic glaze, 2 tbsp – $1.00.
Wooden/bamboo skewers – $1.50.
Estimated Total Recipe Cost
Approximately $12.30 USD.
Estimated Cost Per Serving
Approximately $0.51 USD per serving.
3. Cucumber Hummus Cups

Ingredients
For the Cucumber Hummus Cups
- 2 large English cucumbers, about 12–14 ounces each.
- 1 cup hummus, homemade or store-bought.
- 2 tablespoons cherry tomatoes, finely diced.
- 2 tablespoons red bell pepper, finely diced.
- 1 tablespoon red onion, finely diced.
- 1 tablespoon fresh parsley, finely chopped.
- 1 tablespoon crumbled feta cheese.
- 1 teaspoon extra-virgin olive oil.
- 1/4 teaspoon smoked paprika.
- 1/4 teaspoon freshly ground black pepper.
Optional Ingredients
For extra flavor and color, you can also add.
- 1 tablespoon chopped fresh dill.
- 1 tablespoon sliced Kalamata olives.
- 1 teaspoon toasted sesame seeds.
- A small pinch of crushed red pepper flakes.
- A light squeeze of fresh lemon juice.
Ingredient Substitutions
- English cucumbers: Persian cucumbers can be used for smaller cups. Regular garden cucumbers also work, but remove some of the watery center if necessary.
- Hummus: Use roasted red pepper, garlic, avocado, or lemon hummus instead of classic hummus.
- Feta cheese: Goat cheese or crumbled queso fresco can be used.
- Parsley: Substitute fresh dill, cilantro, or chives.
- Cherry tomatoes: Diced grape tomatoes work just as well.
- Red bell pepper: Yellow or orange bell pepper can be substituted.
- Olive oil: Avocado oil can be used for a mild flavor.
Equipment Needed
- Cutting board.
- Sharp chef’s knife.
- Small spoon or melon baller.
- Small mixing bowl.
- Measuring spoons.
- Measuring cup.
- Small serving platter.
- Paper towels.
Step-by-Step Instructions
Step 1: Wash and dry the cucumbers
Rinse the English cucumbers thoroughly under cool running water. Pat them completely dry with paper towels.
Cut off both ends of each cucumber.
The cucumbers should be clean, dry, and firm with no wet surface remaining.
Dry cucumbers are easier to cut and help prevent the hummus from becoming watery.
Step 2: Cut the cucumber into cups
Slice each cucumber into pieces about 1 1/2 inches thick.
Stand each piece upright on the cutting board. Using a small spoon or melon baller, carefully scoop out some of the center, leaving a solid layer of cucumber at the bottom.
Do not scoop all the way through.
Each cucumber piece should look like a tiny cup with an open top and a cucumber base underneath.
Leave enough cucumber around the sides so the cups remain sturdy when filled.
Step 3: Remove excess moisture
If the cucumber pieces look particularly juicy inside, gently blot the inside and outside with paper towels.
This small step makes a noticeable difference because excess cucumber moisture can thin the hummus and make the appetizer messy.
Step 4: Prepare the toppings
Finely dice the cherry tomatoes, red bell pepper, and red onion.
Chop the fresh parsley and set all the toppings near your work surface.
Keep the vegetables small enough to sit comfortably on top of the hummus without falling off.
Step 5: Fill the cucumber cups
Spoon approximately 1 1/2 tablespoons of hummus into each cucumber cup.
Do not overfill them.
The hummus should reach close to the top while leaving enough room for the toppings.
For a cleaner presentation, transfer the hummus to a piping bag or zip-top bag, snip off one corner, and pipe it directly into the cucumber cups.
Step 6: Add the fresh toppings
Sprinkle a small amount of diced tomato, red bell pepper, red onion, and parsley over each hummus-filled cucumber cup.
Add a little crumbled feta to each one.
The finished cups should have a colorful mixture of red, green, white, and creamy hummus visible from the top.
Step 7: Finish with seasoning
Arrange the cucumber hummus cups on a serving platter.
Drizzle the olive oil lightly over the cups. Finish with smoked paprika and freshly ground black pepper.
If desired, add a tiny squeeze of lemon juice and a sprinkle of fresh dill.
Step 8: Serve immediately or chill briefly
These Cucumber Hummus Cups are best served immediately while the cucumber is crisp.
If you want to prepare them slightly ahead of time, refrigerate them uncovered or loosely covered for up to about 2 hours.
Serve chilled or slightly cool.
No cooking temperature is required for this recipe.
Nutrition Facts
Cost To Make This Recipe
Item – Estimated Cost (USD).
English cucumbers – $3.00.
Hummus – $2.50.
Fresh vegetables and herbs – $1.50.
Feta cheese – $0.75.
Olive oil and seasonings – $0.50.
Estimated Total Recipe Cost
Approximately $8.25 USD.
Estimated Cost Per Serving
Approximately $2.06 USD per serving.
4. Protein Yogurt Parfait Jars

Ingredients
For the Protein Yogurt Parfait Jars
- 2 cups plain nonfat Greek yogurt.
- 1 scoop vanilla protein powder, about 1.1 ounces.
- 2 tablespoons honey or pure maple syrup.
- 1 teaspoon vanilla extract.
- 1 cup fresh strawberries, sliced.
- 1 cup fresh blueberries.
- 1 medium banana, sliced.
- 1 cup low-sugar granola.
- 2 tablespoons chia seeds.
- 2 tablespoons sliced almonds.
Optional Ingredients
- 1 tablespoon peanut butter or almond butter.
- 2 tablespoons shredded unsweetened coconut.
- 1 tablespoon hemp seeds.
- 1 tablespoon mini dark chocolate chips.
- 1/2 cup raspberries or blackberries.
- A pinch of ground cinnamon.
Ingredient Substitutions
- Greek yogurt: Use plain 2% or whole-milk Greek yogurt for a richer parfait. For a dairy-free version, use a thick plant-based yogurt with a high-protein content.
- Protein powder: Vanilla protein powder works best, but unflavored protein powder can also be used.
- Honey: Substitute pure maple syrup or your preferred sweetener.
- Strawberries: Raspberries, blackberries, peaches, or chopped apples work well.
- Blueberries: Use frozen blueberries if fresh berries are unavailable. Thaw and drain them first to prevent excess liquid.
- Granola: Use your favorite low-sugar granola, toasted oats, or a crunchy cereal.
- Almonds: Replace with chopped pecans, walnuts, pumpkin seeds, or sunflower seeds if needed.
- Chia seeds: Ground flaxseed or hemp seeds can be used instead.
Equipment Needed
- 4 small mason jars or meal-prep containers with lids.
- Medium mixing bowl.
- Measuring cups.
- Measuring spoons.
- Kitchen scale, optional.
- Small spoon or spatula.
- Knife.
- Cutting board.
Step-by-Step Instructions
Step 1: Prepare the protein yogurt mixture
Add the Greek yogurt, vanilla protein powder, honey, and vanilla extract to a medium mixing bowl.
Stir thoroughly until the protein powder is completely incorporated and the yogurt looks smooth and creamy.
If the mixture becomes too thick, stir in 1 to 2 tablespoons of milk until you reach a spoonable consistency.
The yogurt should look smooth with no visible pockets or dry streaks of protein powder.
Mix the protein powder into the yogurt before building the jars. This helps prevent dry clumps throughout the parfait.
Step 2: Prepare the fruit
Wash the strawberries and blueberries under cool running water and pat them dry.
Slice the strawberries into bite-size pieces. Slice the banana just before assembling the jars so it has less time to brown.
Set the prepared fruit aside.
Make sure the fruit is reasonably dry. Excess water can make the granola soft and watery.
Step 3: Add the first yogurt layer
Place four clean jars on your work surface.
Divide approximately half of the protein yogurt mixture evenly among the jars.
Use the back of a spoon to spread the yogurt into an even layer.
Step 4: Add the berries
Divide the sliced strawberries and blueberries among the four jars.
You can layer the berries separately for a colorful look or gently mix them together.
Step 5: Add the banana
Add a layer of sliced banana to each jar.
For the freshest texture, keep the banana in the middle of the jar rather than directly against the lid.
If you’re preparing the jars more than one day ahead, consider adding the banana shortly before eating because sliced bananas can brown and soften over time.
Step 6: Add granola and seeds
Sprinkle the granola, chia seeds, and sliced almonds evenly among the jars.
For maximum crunch, place the granola in a small separate container if you plan to store the parfaits for several days.
The layers should be evenly distributed without packing the granola tightly.
Step 7: Finish with the remaining yogurt
Divide the remaining protein yogurt mixture among the jars.
Add another small layer of berries on top if desired.
Finish with sliced almonds, chia seeds, or another light sprinkle of granola.
Step 8: Cover and refrigerate
Secure the lids tightly and place the Protein Yogurt Parfait Jars in the refrigerator.
Chill for at least 30 minutes before serving if you want the ingredients to become nicely chilled.
For meal prep, keep the jars refrigerated at 40°F or below.
For the best texture, enjoy them within 1 to 2 days, especially if banana and granola are already layered inside.
Step 9: Add optional toppings before serving
Just before eating, add peanut butter, almond butter, coconut, hemp seeds, or a few extra fresh berries.
If you stored the granola separately, sprinkle it over the top right before serving for maximum crunch.
Nutrition Facts
Cost To Make This Recipe
Item – Estimated Cost (USD).
Greek yogurt – $2.50.
Protein powder – $1.50.
Fresh fruit – $3.00.
Granola – $1.50.
Chia seeds and almonds – $1.00.
Honey and vanilla – $0.75.
Estimated Total Recipe Cost
Approximately $10.25 USD.
Estimated Cost Per Serving
Approximately $2.56 USD per serving.
5. Hard Boiled Egg Packs

Ingredients
For 4 Hard Boiled Egg Packs
- 8 large eggs.
- 4 ounces cheddar cheese, cut into 4 portions.
- 1 cup seedless grapes, divided among the packs.
- 1 cup whole-grain crackers, divided among the packs.
- 1 cup baby carrots, divided among the packs.
Optional Ingredients
- 1/4 teaspoon salt, for sprinkling over the eggs.
- 1/4 teaspoon black pepper.
- 1 teaspoon everything bagel seasoning.
- 2 tablespoons hummus, divided among the packs.
- 1/4 cup roasted almonds or other nuts.
- 1 small apple, sliced and divided among the packs.
- 1 tablespoon hot sauce, served separately.
Ingredient Substitutions
- Cheddar cheese: Use Monterey Jack, Colby Jack, mozzarella, or a cheese stick.
- Grapes: Substitute berries, apple slices, orange segments, or melon.
- Whole-grain crackers: Use pretzel thins, pita crackers, or your favorite crackers.
- Baby carrots: Celery sticks, cucumber slices, bell pepper strips, or snap peas work well.
- Hummus: Replace with guacamole, ranch dip, or another favorite vegetable dip.
- Almonds: Use walnuts, pecans, cashews, or sunflower seeds if preferred.
Equipment Needed
- Large saucepan or pot.
- Large bowl.
- Ice.
- Measuring cups.
- Measuring spoons.
- Slotted spoon.
- Cutting board.
- Chef’s knife or small kitchen knife.
- 4 meal-prep containers with lids.
- Small food-safe cups or silicone containers for dips, if using.
- Refrigerator.
Step-by-Step Instructions
Step 1: Place the eggs in a saucepan
Arrange the 8 large eggs in a single layer in a saucepan. Add enough cold water to cover the eggs by about 1 inch.
Starting with cold water helps the eggs heat gradually and makes the cooking process more consistent.
The eggs should be completely submerged with a little water above them.
Avoid stacking the eggs if possible. A single layer helps them cook evenly.
Step 2: Bring the water to a boil
Place the saucepan over medium-high heat. Bring the water to a full, rolling boil.
Once the water is boiling, carefully remove the saucepan from the heat and cover it with a lid.
For large eggs, let them sit covered in the hot water for about 10–12 minutes.
If you prefer a slightly softer center, use closer to 10 minutes. For firm, fully cooked yolks, use about 12 minutes.
After cooking, the egg whites should be completely firm and the yolks should no longer look wet or translucent.
Step 3: Prepare an ice bath
While the eggs are cooking, fill a large bowl with cold water and plenty of ice.
When the eggs are finished cooking, carefully transfer them to the ice bath using a slotted spoon.
Let them cool for about 10 minutes.
The ice bath stops the cooking process and helps prevent the yolks from becoming overcooked.
Step 4: Peel the eggs
Once the eggs are cool enough to handle, gently tap each egg against a hard surface and roll it lightly to crack the shell.
Peel the shell away under cool running water if necessary.
Pat the eggs dry with a clean paper towel.
The peeled eggs should have smooth, firm whites with no remaining pieces of shell.
Older eggs often peel more easily than very fresh eggs.
Step 5: Prepare the pack ingredients
Cut the cheddar cheese into four equal portions.
Wash the grapes and baby carrots thoroughly and allow them to dry.
Measure the crackers into four equal portions.
If using hummus or another dip, place about 1/2 tablespoon into each small container.
Step 6: Assemble the Hard Boiled Egg Packs
Place 2 hard-boiled eggs into each meal-prep container.
Add.
1 ounce cheddar cheese.
1/4 cup grapes.
1/4 cup whole-grain crackers.
1/4 cup baby carrots.
Keep any wet ingredients such as hummus in a separate small container inside the meal-prep box.
Sprinkle the eggs with a little salt, black pepper, or everything bagel seasoning if desired.
Step 7: Refrigerate the packs
Close each container tightly and place the Hard Boiled Egg Packs in the refrigerator.
Keep the refrigerator at 40°F or below.
For the best texture and freshness, enjoy the prepared packs within 3–4 days.
If the packs have been sitting at room temperature for more than 2 hours, do not save them for later.
Nutrition Facts
Cost To Make This Recipe
Item – Estimated Cost (USD).
8 large eggs – $2.50.
4 oz cheddar cheese – $2.00.
Grapes – $1.50.
Whole-grain crackers – $1.50.
Baby carrots – $1.00.
Estimated Total Recipe Cost
Approximately $8.50 USD.
Estimated Cost Per Serving
Approximately $2.13 USD per serving.
6. Cheese And Nut Snack Packs

Ingredients
Main Ingredients
- 8 ounces cheddar cheese, cut into 1/2-inch cubes.
- 1 cup roasted almonds, unsalted or lightly salted.
- 1 cup roasted cashews, unsalted or lightly salted.
- 1 cup seedless red or green grapes, washed and thoroughly dried.
- 1/2 cup whole-grain crackers.
- 1/4 cup dried cranberries.
Optional Ingredients
- 1/4 cup mini pretzels.
- 1/4 cup roasted pistachios.
- 1/4 cup dried apricots, chopped.
- 1/4 cup apple slices.
- 2 tablespoons sunflower seeds.
Ingredient Substitutions
- Cheddar cheese: Use Colby Jack, Monterey Jack, Swiss, mozzarella, or pepper jack.
- Almonds: Replace with walnuts, pecans, pistachios, or pumpkin seeds.
- Cashews: Use another favorite nut or seed if preferred.
- Grapes: Substitute blueberries, strawberries, or apple chunks.
- Dried cranberries: Raisins, dried cherries, or chopped dates work well.
- Whole-grain crackers: Use multigrain crackers, pita chips, or gluten-free crackers.
Equipment Needed
- Cutting board.
- Chef’s knife or paring knife.
- Measuring cups.
- Measuring spoons.
- Large mixing bowl.
- Small food storage containers with lids.
- Paper towels or a clean kitchen towel.
- Refrigerator.
Step-by-Step Instructions
Step 1: Wash and dry the fruit
Wash the grapes under cool running water and drain them well.
Pat them completely dry with paper towels or a clean kitchen towel.
The grapes should look clean and dry, with no excess water on their surfaces.
Excess moisture can make crackers soft and can reduce the overall freshness of the snack packs.
Step 2: Cut the cheese
Place the cheddar cheese on a clean cutting board and cut it into approximately 1/2-inch cubes.
Try to keep the pieces similar in size so each snack pack gets an even amount.
The cheese pieces should be bite-size and easy to eat without additional cutting.
Step 3: Prepare the dry ingredients
Measure the almonds, cashews, whole-grain crackers, and dried cranberries.
If using optional ingredients such as pistachios, pretzels, or dried fruit, measure those now as well.
Keep the crackers and nuts dry.
Step 4: Portion the ingredients
Divide the cheese cubes evenly among 6 small food containers.
Add approximately.
1/3 cup cheese.
2 tablespoons almonds.
2 tablespoons cashews.
1/6 cup grapes.
A small handful of whole-grain crackers.
About 1 tablespoon dried cranberries.
The exact portions do not need to be perfect. The goal is to create balanced, convenient snack packs.
Step 5: Add optional ingredients
If desired, add a few mini pretzels, pistachios, dried apricots, sunflower seeds, or other favorite snack ingredients.
Avoid adding too many ingredients. A simple combination usually tastes better and keeps the snack packs easier to portion.
Step 6: Seal and refrigerate
Close each container tightly with its lid.
Refrigerate the finished Cheese And Nut Snack Packs at 40°F or below until ready to eat.
For the best texture and freshness, keep the crackers separated from moist ingredients when possible.
Step 7: Serve
Take one snack pack from the refrigerator whenever you need a quick snack.
The cheese should be firm but easy to bite, the nuts should remain crunchy, and the fruit should look fresh.
For the best eating experience, let the snack pack sit at room temperature for about 5 to 10 minutes before eating if you prefer slightly softer cheese.
Nutrition Facts
Cost To Make This Recipe
Item – Estimated Cost (USD).
Cheddar cheese – $2.50.
Roasted almonds – $2.00.
Roasted cashews – $2.25.
Seedless grapes – $0.90.
Whole-grain crackers – $0.50.
Dried cranberries – $0.75.
Estimated Total Recipe Cost
Approximately $8.90 USD.
Estimated Cost Per Serving
Approximately $1.48 USD per serving.
7. Apple Slices With Peanut Butter

Ingredients
Main Ingredients
- 2 medium apples – About 6 to 7 ounces each. Honeycrisp, Fuji, Gala, Pink Lady, or Granny Smith all work well.
- 1/4 cup creamy peanut butter – Choose regular or natural peanut butter according to your preference.
- 1 teaspoon fresh lemon juice – Helps slow apple browning and adds a subtle fresh flavor.
Optional Toppings
- 1/4 teaspoon ground cinnamon.
- 1 tablespoon granola.
- 1 tablespoon chopped peanuts.
- 1 tablespoon mini chocolate chips.
- 1 teaspoon chia seeds.
- 1 teaspoon honey or maple syrup.
- 1 tablespoon unsweetened shredded coconut.
Ingredient Substitutions
- Peanut butter: Use almond butter, cashew butter, sunflower seed butter, or another nut-free seed butter.
- Apples: Use any firm, crisp apple variety you enjoy.
- Lemon juice: Lime juice can be used in a pinch, although it has a slightly different flavor.
- Honey: Maple syrup works well for a different flavor.
- Creamy peanut butter: Crunchy peanut butter is an excellent choice if you want extra texture.
Equipment Needed
- Cutting board.
- Sharp chef’s knife or paring knife.
- Small bowl.
- Butter knife or small spatula.
- Measuring cups.
- Measuring spoons.
- Serving plate.
- Optional: apple corer.
Step-by-Step Instructions
Step 1: Wash the Apples
Rinse the apples thoroughly under cool running water. Rub the skin gently with your hands to remove any dirt or residue.
Pat the apples dry with a clean kitchen towel or paper towel.
The apples should look clean and dry before cutting.
There is no need to peel the apples. The skin adds color, texture and fiber.
Step 2: Slice the Apples
Place one apple on a stable cutting board. Carefully cut it in half from top to bottom.
Remove the core and seeds. Then cut each half into slices about 1/4 to 1/2 inch thick.
Repeat with the second apple.
You can make thin slices for dipping or thicker slices if you want them to hold more peanut butter.
The slices should be even enough to pick up easily without breaking.
Do not make the slices extremely thin. Very thin apple slices can become soft or difficult to handle.
Step 3: Add Lemon Juice
Place the apple slices in a bowl and gently toss them with 1 teaspoon of lemon juice.
You do not need to soak the apples. A light coating is enough to help reduce browning.
If you are serving the apple slices immediately, you can skip the lemon juice.
Step 4: Prepare the Peanut Butter
Measure 1/4 cup peanut butter and place it in a small bowl.
If your peanut butter is very thick, stir it well before serving. Natural peanut butter may need extra stirring because the oil can separate during storage.
For easier spreading, let refrigerated peanut butter sit at room temperature for a few minutes.
The peanut butter should be smooth and easy to spread.
Step 5: Arrange the Apple Slices
Arrange the apple slices on a serving plate.
Spread approximately 1 teaspoon of peanut butter over each apple slice, or serve the peanut butter in a small bowl for dipping.
There is no cooking or oven temperature required for this recipe.
Step 6: Add Your Favorite Toppings
For extra flavor and texture, sprinkle the apple slices with your preferred toppings.
Try.
Cinnamon for warm, simple flavor.
Granola for crunch.
Chia seeds for extra texture.
Chopped peanuts for more peanut flavor.
Mini chocolate chips for a sweeter snack.
Shredded coconut for a tropical twist.
You can also drizzle a small amount of honey or maple syrup over the top.
Start with one or two toppings rather than adding everything at once. The best apple and peanut butter snacks keep the flavors simple.
Step 7: Serve Immediately
Apple Slices With Peanut Butter taste best when freshly prepared.
Serve them as a quick breakfast, afternoon snack, after-school snack, or easy lunch-box addition.
For the best texture, eat them soon after assembling.
Nutrition Facts
Cost To Make This Recipe
Item – Estimated Cost (USD).
2 medium apples – $1.50.
1/4 cup peanut butter – $0.85.
Lemon juice – $0.15.
Estimated Total Recipe Cost
Approximately $2.50 USD.
Estimated Cost Per Serving
Approximately $1.25 USD per serving.
8. Frozen Grapes

Ingredients
Main Ingredients
- 2 pounds seedless grapes – green, red, or a combination of both.
- 1 tablespoon fresh lemon juice – optional, for a slightly brighter flavor.
Optional Ingredients
- 1 tablespoon granulated sugar – optional if you prefer sweeter grapes.
- 1 teaspoon lime zest – optional for a fresh citrus flavor.
- 1 tablespoon finely chopped fresh mint – optional for serving.
Ingredient Substitutions
- Green grapes: Substitute with red or black seedless grapes.
- Red grapes: Use green grapes for a slightly more tart flavor.
- Lemon juice: Lime juice can be used instead.
- Fresh grapes: Seedless grapes work best because they are easier and more pleasant to eat once frozen.
Equipment Needed
- Large colander.
- Large bowl.
- Clean kitchen towel or paper towels.
- Rimmed baking sheet.
- Parchment paper or silicone baking mat.
- Measuring spoons.
- Freezer-safe airtight container or freezer bag.
- Freezer.
Step-by-Step Instructions
Step 1: Wash the grapes
Place the grapes in a colander and rinse them thoroughly under cool running water.
Gently rub the grapes with your fingers to remove dirt and residue. Drain well.
The grapes should look clean and free of visible dirt or residue.
Step 2: Remove the grapes from the stems
Pull each grape away from the stem and discard any grapes that are bruised, damaged, or unusually soft.
Give the grapes another quick rinse if needed.
Removing the grapes from the stems before freezing makes them much easier to grab and eat later.
Step 3: Dry the grapes completely
Spread the grapes over a clean kitchen towel or several layers of paper towels.
Gently pat them dry and allow them to air-dry for a few minutes.
This step is important because excess water can create a layer of ice around the grapes.
The grapes should look dry rather than covered with water droplets.
Do not freeze very wet grapes. Excess moisture can cause them to stick together and form large ice crystals.
Step 4: Add optional flavoring
Place the dry grapes in a large bowl.
If desired, add 1 tablespoon of lemon juice and gently toss until the grapes are lightly coated.
For a sweeter snack, you can add 1 tablespoon of granulated sugar and toss gently.
You can also add a small amount of lime zest or chopped fresh mint.
For the simplest version, skip all additions and freeze the grapes plain.
Step 5: Arrange the grapes on a baking sheet
Line a rimmed baking sheet with parchment paper or a silicone baking mat.
Spread the grapes across the sheet in a single layer.
Try to leave a little space between the grapes so they do not freeze into one large clump.
Each grape should sit separately on the baking sheet.
Step 6: Freeze the grapes
Place the baking sheet in a freezer set to 0°F (-18°C) or below.
Freeze the grapes for 4–6 hours, or until they are completely firm.
For the best texture, freezing them overnight is also fine.
The grapes should feel hard and icy when gently pressed.
Step 7: Transfer to a freezer-safe container
Once the grapes are fully frozen, transfer them to an airtight freezer container or freezer bag.
Remove as much excess air as practical before sealing.
Label the container with the date and return it to the freezer.
Step 8: Serve the Frozen Grapes
Frozen Grapes can be eaten straight from the freezer.
Let them sit at room temperature for about 2–5 minutes if you prefer a slightly softer texture.
They are delicious as a quick snack, after-school treat, or naturally sweet frozen dessert.
Nutrition Facts
Cost To Make This Recipe
Item – Estimated Cost (USD).
2 pounds seedless grapes – $8.00.
Optional lemon juice – $0.25.
Estimated Total Recipe Cost
Approximately $8.25 USD.
Estimated Cost Per Serving
Approximately $1.03 USD per serving.
9. Chicken Salad Lettuce Wraps

Ingredients
For the Chicken Salad
- 3 cups cooked chicken, shredded or chopped.
- 1/2 cup mayonnaise.
- 1/4 cup plain Greek yogurt.
- 1 tablespoon fresh lemon juice.
- 1 teaspoon Dijon mustard.
- 1/2 teaspoon garlic powder.
- 1/2 teaspoon onion powder.
- 1/4 teaspoon salt.
- 1/4 teaspoon black pepper.
- 1/2 cup celery, finely diced.
- 1/3 cup red grapes, halved.
- 1/4 cup red onion, finely diced.
- 2 tablespoons fresh parsley, chopped.
For the Lettuce Wraps
- 8 large butter lettuce leaves or romaine lettuce leaves.
- 1/2 cup shredded carrots, optional.
- 1/4 cup sliced almonds, optional.
- 1/4 cup diced cucumber, optional.
Optional Ingredients
For extra flavor or texture, you can also add.
- 1 tablespoon chopped fresh dill.
- 1 tablespoon chopped green onions.
- 1/4 teaspoon paprika.
- 1 tablespoon honey for a slightly sweeter chicken salad.
- 1/4 cup dried cranberries.
- A pinch of cayenne pepper for heat.
Ingredient Substitutions
- Chicken: Use leftover roasted chicken, rotisserie chicken, grilled chicken, or poached chicken.
- Mayonnaise: Replace some or all of the mayonnaise with additional plain Greek yogurt for a lighter dressing.
- Greek yogurt: Sour cream can be used instead.
- Grapes: Diced apples or dried cranberries work well.
- Celery: Use finely chopped cucumber for a different type of crunch.
- Lettuce: Butter lettuce is soft and flexible, while romaine provides extra crunch.
- Dijon mustard: Yellow mustard can be substituted, although the flavor will be slightly milder.
Equipment Needed
- Large mixing bowl.
- Small mixing bowl.
- Cutting board.
- Chef’s knife.
- Measuring cups.
- Measuring spoons.
- Large spoon or spatula.
- Forks for shredding chicken.
- Colander or salad spinner.
- Paper towels or clean kitchen towel.
- Serving platter.
Step-by-Step Instructions
Step 1: Prepare the Lettuce
Separate 8 large lettuce leaves carefully so they do not tear.
Rinse the leaves under cold water, then dry them thoroughly with paper towels or use a salad spinner.
The lettuce should look fresh, crisp, and dry before filling.
Excess water can make the wraps soggy and cause the chicken salad to slide out.
Step 2: Prepare the Chicken
If using leftover or rotisserie chicken, remove the skin and bones if necessary.
Shred or chop the chicken into small, bite-sized pieces.
You want the chicken pieces to be small enough to scoop easily into the lettuce but large enough to provide a satisfying texture.
If Cooking Chicken From Scratch
Cook boneless, skinless chicken breasts until the thickest part reaches 165°F, as measured with an instant-read thermometer.
Allow the chicken to cool before chopping or shredding it.
Properly cooked chicken should be opaque throughout with no raw-looking center.
Step 3: Make the Creamy Dressing
In a small bowl, combine.
Mayonnaise.
Greek yogurt.
Lemon juice.
Dijon mustard.
Garlic powder.
Onion powder.
Salt.
Black pepper.
Stir until the mixture is smooth and creamy.
Taste the dressing and adjust the seasoning if needed.
If you prefer a tangier chicken salad, add another teaspoon of lemon juice.
Step 4: Combine the Chicken Salad
Place the chopped chicken in a large mixing bowl.
Add the diced celery, halved grapes, red onion, and parsley.
Pour the creamy dressing over the chicken mixture.
Gently stir everything together until the chicken is evenly coated.
Avoid aggressively mixing the ingredients because the grapes can become crushed and watery.
Step 5: Chill the Chicken Salad
For the best flavor, cover the bowl and refrigerate the chicken salad for at least 20–30 minutes.
This short resting time allows the flavors to blend.
If you’re in a hurry, you can serve it immediately, but chilled chicken salad generally tastes better.
Step 6: Assemble the Lettuce Wraps
Place one lettuce leaf on a plate or clean work surface.
Spoon approximately 1/2 to 3/4 cup of chicken salad into the center of the leaf.
Add optional shredded carrots, sliced almonds, or diced cucumber.
Fold the sides of the lettuce inward and gently roll it like a wrap.
If the lettuce leaves are small, use two leaves together to create a stronger wrapper.
Step 7: Serve
Serve the Chicken Salad Lettuce Wraps immediately while the lettuce is cold and crisp.
They pair nicely with fresh fruit, vegetable sticks, a simple green salad, or baked sweet potato fries.
Nutrition Facts
Cost To Make This Recipe
Item – Estimated Cost (USD).
Cooked chicken – $7.00.
Mayonnaise – $0.75.
Greek yogurt – $0.50.
Vegetables and herbs – $2.00.
Grapes – $1.00.
Lettuce – $2.00.
Lemon and seasonings – $0.75.
Estimated Total Recipe Cost
Approximately $14.00 USD.
Estimated Cost Per Serving
Approximately $3.50 USD per serving.
10. Air Popped Popcorn Bag

Ingredients
Main Ingredients
- 1/4 cup popcorn kernels.
- 1 teaspoon olive oil or avocado oil, optional.
- 1/4 teaspoon fine salt, or to taste.
Optional Ingredients
- 1 tablespoon melted unsalted butter.
- 1/4 teaspoon garlic powder.
- 1/4 teaspoon smoked paprika.
- 1 tablespoon grated Parmesan cheese.
- 1/2 teaspoon ranch seasoning.
- 1 teaspoon nutritional yeast.
- 1 tablespoon cinnamon sugar for a sweet version.
Ingredient Substitutions
- Popcorn kernels: Use any standard yellow or white popcorn kernels. Avoid pre-seasoned or microwave popcorn kernels.
- Olive oil: Substitute avocado oil, melted coconut oil, or another mild-flavored oil.
- Butter: Use plant-based butter for a dairy-free topping.
- Fine salt: Kosher salt can work, but fine popcorn salt sticks more easily to freshly popped kernels.
- Nutritional yeast: Parmesan cheese can be used if you prefer a cheesy flavor.
Equipment Needed
- Microwave.
- Plain microwave-safe paper lunch bag.
- Measuring cups.
- Measuring spoons.
- Small bowl, if using melted butter or seasonings.
- Large serving bowl.
- Oven mitts or a kitchen towel.
Step-by-Step Instructions
Step 1: Measure the popcorn kernels
Measure 1/4 cup popcorn kernels and check them for any unusual pieces or debris.
Place the kernels into a plain paper lunch bag.
For the best results, keep the kernels in a single loose layer near the bottom of the bag. Do not fill the bag with extra kernels because popped corn needs room to expand.
Step 2: Add optional oil
If you want to use oil, add 1 teaspoon olive oil or avocado oil to the kernels.
Fold the top of the bag over several times to close it securely. Gently shake the bag so the kernels are lightly coated.
You can also skip the oil completely. The popcorn will still pop because popcorn kernels contain enough moisture inside their centers to create steam.
Step 3: Place the bag in the microwave
Stand the paper bag upright in the center of the microwave with the folded opening facing upward.
Set the microwave to HIGH power.
Start with 2 minutes and 30 seconds.
Microwave power varies considerably between models, so the exact cooking time may be different in your kitchen.
Step 4: Listen carefully as the popcorn pops
Stay near the microwave and listen.
At first, you will hear individual pops. As the popcorn continues cooking, the popping will become faster.
When the popping slows to approximately 1 pop every 2 to 3 seconds, stop the microwave.
This is the most important visual and audio cue. Do not wait until every kernel has popped.
Stopping slightly early is better than burning the popcorn.
Step 5: Carefully remove the bag
The bag and steam inside can be hot.
Using oven mitts or a kitchen towel, carefully remove the bag from the microwave. Open it slowly and keep your face and hands away from the escaping steam.
The finished popcorn should look fluffy and dry, with most of the kernels popped.
Step 6: Transfer the popcorn to a bowl
Pour the freshly popped popcorn into a large serving bowl.
Look through the popcorn and remove any unpopped kernels before serving.
Be careful because some unpopped kernels can hide underneath the popped pieces.
Step 7: Add your favorite toppings
For classic popcorn, sprinkle with 1/4 teaspoon fine salt and toss well.
For buttery popcorn, drizzle 1 tablespoon melted butter over the popcorn while tossing continuously.
For a savory version, try garlic powder, Parmesan cheese, ranch seasoning, smoked paprika, or nutritional yeast.
For a sweet snack, lightly toss the popcorn with cinnamon sugar.
Step 8: Serve immediately
Homemade air popped popcorn tastes best while it is fresh and crisp.
Serve it immediately for movie night, game day, an after-school snack, or a quick afternoon treat.
Nutrition Facts
Cost To Make This Recipe
Item – Estimated Cost (USD).
1/4 cup popcorn kernels – $0.20.
Paper lunch bag – $0.10.
Salt – $0.02.
Optional oil – $0.05.
Estimated Total Recipe Cost
Approximately $0.37 USD.
Estimated Cost Per Serving
Approximately $0.09 USD per serving.
11. Dark Chocolate Almond Clusters

Ingredients
Main Ingredients
- 8 ounces dark chocolate, chopped or dark chocolate melting wafers.
- 1 1/2 cups whole roasted almonds, unsalted.
- 1 teaspoon coconut oil, optional but helpful for smoother melted chocolate.
- 1/4 teaspoon fine sea salt.
Optional Ingredients
- 1/2 teaspoon pure vanilla extract – adds extra flavor.
- 1/4 teaspoon ground cinnamon – gives the clusters a warm, slightly spiced taste.
- 1 tablespoon finely shredded unsweetened coconut – for a coconut-chocolate variation.
- 1 tablespoon flaky sea salt – for sprinkling on top.
- 2 tablespoons dried cranberries, finely chopped – for a sweet and tangy variation.
Ingredient Substitutions
- Dark chocolate: Use semisweet chocolate if you prefer a sweeter flavor.
- Almonds: Pecans, walnuts, cashews, or a combination of nuts can be substituted.
- Coconut oil: You can leave it out completely. It simply helps create a smoother, more fluid chocolate coating.
- Sea salt: Regular fine table salt can be used, but use a little less because it is more concentrated by volume.
- Roasted almonds: Raw almonds can work, but roasting them first gives the clusters much better flavor and crunch.
Equipment Needed
- Microwave-safe bowl or double boiler.
- Silicone spatula or wooden spoon.
- Baking sheet.
- Parchment paper or silicone baking mat.
- Small cookie scoop or tablespoon.
- Measuring cups and spoons.
- Cutting board.
- Chef’s knife, if using a chocolate bar.
- Refrigerator.
- Airtight storage container.
Step-by-Step Instructions
Step 1: Prepare the baking sheet
Line a baking sheet with parchment paper or a silicone baking mat.
Make sure the baking sheet fits comfortably in your refrigerator.
The surface should be completely flat so the chocolate clusters can set evenly.
Do not skip the parchment paper. Melted chocolate can stick firmly to an unlined baking sheet.
Step 2: Prepare the almonds
If you are using pre-roasted almonds, they are ready to use.
If using raw almonds, spread 1 1/2 cups almonds on a baking sheet and roast them at 350°F for 8–10 minutes.
Shake the pan or stir the almonds halfway through.
Let them cool for a few minutes before coating them with chocolate.
Properly roasted almonds should smell nutty and look lightly toasted, not dark brown.
Almonds can burn quickly near the end of roasting. Start checking them around 7–8 minutes.
Step 3: Melt the dark chocolate
Place 8 ounces of chopped dark chocolate in a microwave-safe bowl.
Add 1 teaspoon coconut oil, if using.
Microwave at 50% power for 30 seconds. Stir well.
Continue heating in 15–20 second intervals, stirring thoroughly after each interval, until the chocolate is almost completely melted.
Remove it from the microwave and continue stirring until completely smooth.
The chocolate should look glossy, smooth, and pourable with no visible pieces remaining.
Do not overheat the chocolate. Chocolate can become thick, grainy, or scorched if exposed to too much heat.
Melt the chocolate in a double boiler over gently simmering water. Keep the water below the bowl and make sure no water gets into the chocolate.
Step 4: Add the flavorings
Stir the 1/4 teaspoon sea salt into the melted chocolate.
If desired, add 1/2 teaspoon vanilla extract or 1/4 teaspoon cinnamon.
Stir until evenly combined.
If using vanilla extract, add only a small amount. Too much liquid can affect the texture of melted chocolate.
Step 5: Add the almonds
Pour the roasted almonds into the melted dark chocolate.
Using a silicone spatula, gently fold the almonds into the chocolate until every almond is well coated.
You should see chocolate covering most of the almonds, with no large dry patches.
Don’t stir too aggressively. Gentle folding keeps the almonds from breaking and helps maintain their crunchy texture.
Step 6: Form the chocolate almond clusters
Use a tablespoon or small cookie scoop to place portions of the chocolate-covered almond mixture onto the prepared baking sheet.
Aim for approximately 12 clusters.
You can make them small for bite-sized treats or slightly larger for a more substantial dessert.
If the mixture starts becoming too thick before you finish scooping, let it sit at room temperature for a minute and gently stir again.
Step 7: Add optional toppings
While the chocolate is still wet, sprinkle the clusters with a small amount of flaky sea salt.
You can also add finely chopped dried cranberries, shredded coconut, or a light dusting of cinnamon.
Don’t add toppings after the chocolate has already hardened because they may not stick.
Step 8: Chill until firm
Place the baking sheet in the refrigerator for approximately 15–20 minutes.
The clusters are ready when the chocolate feels firm to the touch and no longer looks wet.
For a firmer texture, chill them for up to 30 minutes.
The chocolate should look set and slightly glossy rather than soft or wet.
Step 9: Serve and enjoy
Once firm, carefully lift the Dark Chocolate Almond Clusters from the parchment paper.
Serve them chilled, at room temperature, or straight from the refrigerator.
They are especially good with coffee, tea, or a glass of cold milk.
Nutrition Facts
Cost To Make This Recipe
Item – Estimated Cost (USD).
8 oz dark chocolate – $3.50.
1 1/2 cups roasted almonds – $3.25.
Coconut oil – $0.15.
Sea salt and optional flavorings – $0.25.
Estimated Total Recipe Cost
Approximately $7.15 USD.
Estimated Cost Per Serving
Approximately $0.60 USD per serving.
12. Veggie Sticks With Ranch Dip

Ingredients
For the Veggie Sticks
- 2 medium carrots, peeled and cut into sticks.
- 2 celery stalks, cut into sticks.
- 1 medium cucumber, cut into sticks.
- 1 medium red bell pepper, seeds and ribs removed and cut into sticks.
- 1 medium yellow bell pepper, seeds and ribs removed and cut into sticks.
- 1 cup broccoli florets.
- 1 cup cherry tomatoes.
- 1 cup sugar snap peas.
For the Homemade Ranch Dip
- 1/2 cup mayonnaise.
- 1/2 cup sour cream.
- 2 tablespoons buttermilk.
- 1 tablespoon fresh lemon juice.
- 1 teaspoon dried parsley.
- 1/2 teaspoon dried dill.
- 1/2 teaspoon garlic powder.
- 1/4 teaspoon onion powder.
- 1/4 teaspoon kosher salt.
- 1/8 teaspoon black pepper.
Optional Ingredients
- 1 tablespoon finely chopped fresh chives.
- 1 tablespoon finely chopped fresh parsley.
- 1/4 teaspoon smoked paprika.
- 1 teaspoon Worcestershire sauce for extra savory flavor.
Ingredient Substitutions
- Mayonnaise: Use plain Greek yogurt for a lighter, tangier dip.
- Sour cream: Substitute plain Greek yogurt or an unsweetened dairy-free sour cream.
- Buttermilk: Mix 2 teaspoons lemon juice with 2 tablespoons milk and let it sit for about 5 minutes.
- Fresh vegetables: Swap in radishes, grape tomatoes, zucchini, jicama, or snap peas based on what you have available.
- Fresh herbs: Dried herbs work well when fresh herbs are not available.
Equipment Needed
- Cutting board.
- Chef’s knife.
- Vegetable peeler.
- Medium mixing bowl.
- Small whisk or spoon.
- Measuring cups.
- Measuring spoons.
- Serving bowl.
- Large serving platter or tray.
- Paper towels or a clean kitchen towel.
- Airtight container for storage.
Step-by-Step Instructions
Step 1: Wash the Vegetables
Rinse all vegetables thoroughly under cool running water. Gently scrub carrots and cucumbers if needed.
Dry the vegetables well with paper towels or a clean kitchen towel. Removing excess water helps the ranch dip stay thick and keeps the vegetable sticks crisp.
The vegetables should look clean and dry with no visible dirt or excess moisture.
Wash the vegetables before cutting them so dirt and bacteria are not transferred from the outside of the vegetables to the cut surfaces.
Step 2: Prepare the Carrots and Celery
Peel the carrots and trim off the ends. Cut them into sticks about 3 to 4 inches long and roughly 1/2 inch thick.
Trim the celery stalks and cut them into similar-sized sticks.
Try to keep the pieces relatively uniform. This makes the veggie platter look more attractive and makes dipping easier.
Step 3: Cut the Cucumbers and Bell Peppers
Cut the cucumber into sticks about 3 to 4 inches long.
For the bell peppers, cut around the stem and remove the seeds and white ribs. Slice the peppers into sturdy strips.
Avoid cutting the peppers too thin. Slightly thicker pieces are easier to pick up and dip.
Step 4: Prepare the Remaining Vegetables
Separate the broccoli into small, bite-sized florets.
Leave the cherry tomatoes whole and rinse the sugar snap peas.
If the broccoli or snap peas are especially wet, pat them dry before adding them to the platter.
Step 5: Make the Ranch Dip
Add the mayonnaise, sour cream, buttermilk, and lemon juice to a medium mixing bowl.
Whisk until smooth and creamy.
Add the dried parsley, dried dill, garlic powder, onion powder, kosher salt, and black pepper. Whisk again until the herbs and seasonings are evenly distributed.
If using optional fresh chives or parsley, fold them in at the end.
The finished ranch dip should be smooth, creamy, and thick enough to coat the back of a spoon.
Step 6: Adjust the Dip
Taste the ranch dip and adjust the seasoning if needed.
Add a little more lemon juice for brightness, a pinch more salt for flavor, or an extra splash of buttermilk if you prefer a thinner consistency.
For the best flavor, cover the bowl and refrigerate the dip for at least 15 to 30 minutes before serving. This gives the herbs and seasonings time to blend.
Step 7: Arrange the Veggie Sticks
Arrange the carrot, celery, cucumber, and bell pepper sticks on a large serving platter.
Add the broccoli, cherry tomatoes, and sugar snap peas around the vegetable sticks.
Place the ranch dip in a small bowl in the center or alongside the vegetables.
For a party, separate different vegetables into small sections so guests can easily see and choose what they want.
Step 8: Serve
Serve the Veggie Sticks With Ranch Dip chilled or shortly after preparation.
The vegetables should be crisp, colorful, and easy to pick up. The ranch dip should be creamy and cool.
For the best texture, serve within a few hours of cutting the vegetables.
Nutrition Facts
Cost To Make This Recipe
Item – Estimated Cost (USD).
Fresh vegetables – $7.50.
Mayonnaise – $0.80.
Sour cream – $0.70.
Buttermilk – $0.25.
Lemon and seasonings – $0.75.
Estimated Total Recipe Cost
Approximately $10.00 USD.
Estimated Cost Per Serving
Approximately $1.25 USD per serving.


