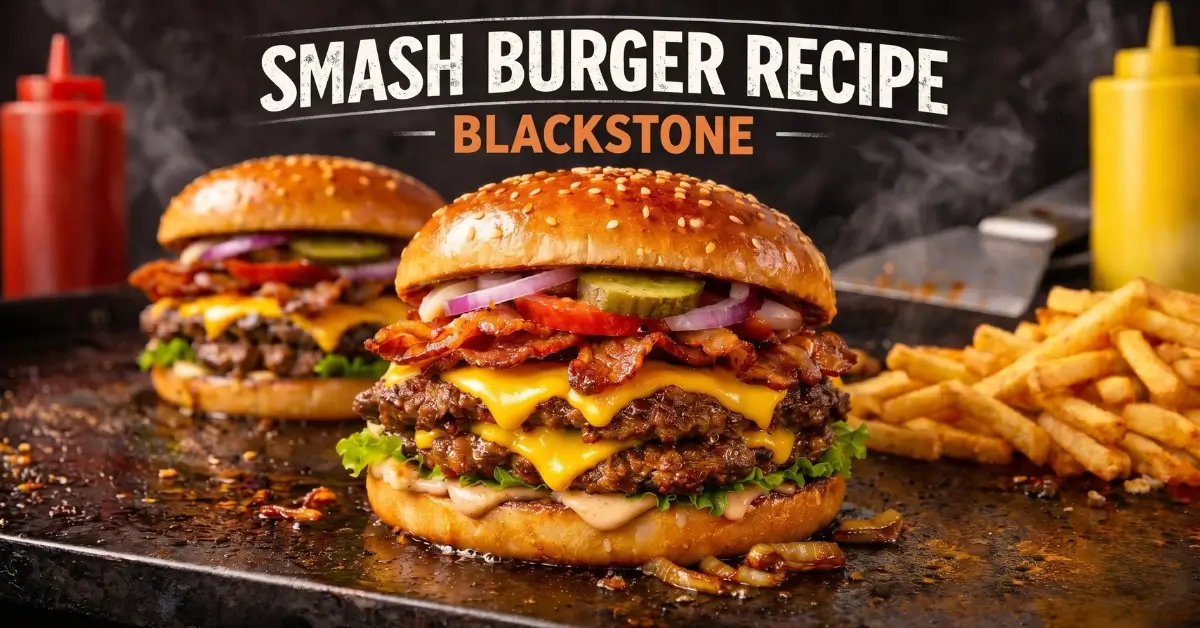

1. Blackstone Smash Burgers With Crispy Edges
Ingredients
For the Smash Burgers
- 1 1/2 pounds 80/20 ground beef.
- 1 teaspoon kosher salt.
- 1/2 teaspoon freshly ground black pepper.
- 1/2 teaspoon garlic powder.
- 8 slices American cheese.
- 1 tablespoon high-heat cooking oil, such as avocado or canola oil.
- 4 soft hamburger buns.
- 1 tablespoon unsalted butter, softened.
For Serving
- 1/4 cup dill pickle slices.
- 1/4 cup thinly sliced yellow onion.
- 4 lettuce leaves.
- 4 thin tomato slices.
- 2 tablespoons ketchup.
- 2 tablespoons yellow mustard.
- 2 tablespoons mayonnaise.
Optional Ingredients
- 4 slices cooked bacon.
- 1 jalapeno, thinly sliced.
- 1/4 cup grilled onions.
- 2 tablespoons burger sauce.
- 1/4 cup crispy fried onions.
- Extra cheese for a richer burger.
Ingredient Substitutions
- Ground beef: An 80/20 beef blend is strongly recommended because the fat helps create juicy patties and crisp edges. A 85/15 blend can work, but the burgers may be slightly less juicy. Very lean ground beef is not ideal for this recipe.
- American cheese: Substitute cheddar, pepper Jack, Colby Jack, or Swiss cheese. American cheese gives the smoothest, fastest melt.
- Avocado oil: Canola oil, vegetable oil, or another neutral high-heat cooking oil works well.
- Hamburger buns: Potato rolls, brioche buns, sesame buns, or soft bakery-style burger buns are good options.
Equipment Needed
- Blackstone griddle or similar flat-top outdoor griddle.
- Blackstone griddle spatula or heavy-duty metal spatula.
- Second spatula or burger press for smashing.
- Parchment paper squares.
- Instant-read meat thermometer.
- Large plate or sheet pan.
- Small mixing bowl.
- Measuring spoons.
- Butter knife.
- Tongs.
- Griddle scraper.
- Paper towels.
Step-by-Step Instructions
1. Preheat the Blackstone Griddle
Preheat the Blackstone griddle over medium-high to high heat for about 8 to 10 minutes. Aim for a cooking surface around 400°F to 450°F.
The griddle needs to be properly hot before the beef touches it. A hot surface creates fast browning and helps produce the signature crust.
The griddle should look fully heated, and a tiny drop of water should sizzle and evaporate quickly.
Do not place the beef on a barely warm griddle. Low heat causes the meat to release moisture and steam instead of developing crispy edges.
2. Divide the Ground Beef
Divide the 1 1/2 pounds of ground beef into 8 equal portions, about 3 ounces each. Gently shape each portion into a loose ball.
Do not pack or roll the beef tightly. Loose meat spreads more naturally during smashing and usually creates a better irregular edge.
Keep the beef balls refrigerated until the griddle is ready.
Cold beef is easier to handle and helps prevent too much fat from softening before cooking.
3. Prepare the Burger Toppings
Before cooking the patties, slice the onion, tomato, pickles, and any other toppings you plan to use. Set out the cheese slices and sauces.
Smash burgers cook extremely fast, so everything should be ready before the beef hits the hot griddle.
Do not start slicing toppings after the patties begin cooking. Even an extra minute can overcook thin smash burger patties.
4. Toast the Buns
Spread the cut sides of the hamburger buns with the softened butter. Place them cut-side down on a medium-hot section of the griddle.
Toast for 1 to 2 minutes.
The buns are ready when the cut surfaces look lightly golden with a few deeper toasted spots.
Transfer them to a clean plate.
Toasted buns hold up better against burger juices and sauces than completely soft, untoasted buns.
5. Lightly Oil the Cooking Surface
If your griddle needs it, spread about 1 tablespoon of high-heat oil into a very thin layer over the burger cooking area.
A well-seasoned Blackstone may need little or no added oil because 80/20 ground beef releases its own fat.
Do not pour a large puddle of oil onto the griddle. Too much oil can reduce direct beef-to-metal contact and work against a firm crust.
6. Place and Smash the Beef
Place 4 cold beef balls on the hot griddle, leaving plenty of room between them. Work in batches if your cooking surface is crowded.
Immediately place a square of parchment paper over each beef ball. Press down very firmly with a burger press or heavy spatula for about 8 to 10 seconds.
Smash each patty until it is roughly 1/4 inch thick.
Remove the parchment paper.
The edges should look thin, uneven, and slightly lacy. Those thin areas become especially crisp.
Do not smash the patties again later in the cooking process. Repeated pressing can force out flavorful juices after the crust begins forming.
7. Season and Cook the First Side
Immediately season the patties with kosher salt, black pepper, and garlic powder.
Cook without moving them for about 1 1/2 to 2 minutes.
The top of each patty will begin losing its raw appearance around the edges. The outer edge should look dark brown and crisp, while rendered beef fat bubbles around the patty.
Resist the urge to move the meat. Uninterrupted contact with the hot griddle is what builds the crust.
8. Scrape and Flip
Slide a sharp metal spatula firmly under each patty. Scrape against the griddle surface so the browned crust stays attached to the beef.
Flip each patty in one confident motion.
Cook the second side for about 45 to 90 seconds.
Do not gently lift only the center of the patty. If browned bits remain stuck to the griddle, you are leaving behind some of the best flavor and texture.
9. Add the Cheese
Place one slice of American cheese on each patty immediately after flipping.
Let the cheese melt as the second side finishes cooking.
For extra-fast melting, briefly cover the patties with a griddle dome for about 20 to 30 seconds. A tiny splash of water beside the patties can create steam, but keep water away from the meat itself.
For food safety, ground beef should reach 160°F internally, following standard U.S. guidance for ground beef.
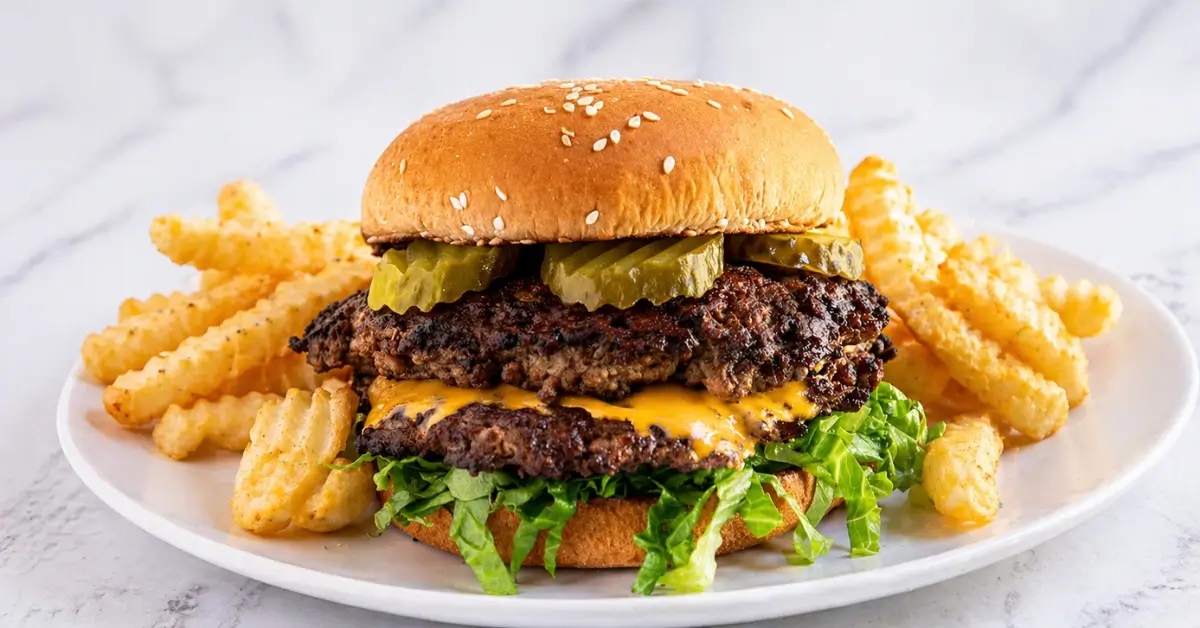
10. Stack the Patties
Stack two cheese-covered patties together for each burger.
This double-patty style gives you more browned surface area, more crispy edges, and a better beef-to-bun ratio than one thick patty.
The cheese should look soft and melted between the hot patties.
11. Assemble and Serve
Spread mayonnaise, mustard, ketchup, or burger sauce over the toasted buns.
Add the double smash patties, then finish with pickles, onion, lettuce, tomato, bacon, jalapeños, or your favorite toppings.
Serve these Blackstone Smash Burgers With Crispy Edges immediately while the patties are hot, the cheese is melted, and the crust is still crisp.
Nutrition Facts
Cost To Make This Recipe
Item – Estimated Cost (USD).
1 1/2 pounds 80/20 ground beef – $7.50.
8 slices American cheese – $2.25.
4 hamburger buns – $2.25.
Butter and cooking oil – $0.60.
Pickles – $0.60.
Onion – $0.35.
Lettuce and tomato – $1.50.
Ketchup, mustard, and mayonnaise – $0.80.
Salt, pepper, and garlic powder – $0.30.
Estimated Total Recipe Cost
Approximately $16.15 USD.
Estimated Cost Per Serving
Approximately $4.04 USD per serving.
2. Blackstone Chicken Philly Cheesesteak Sandwiches
Ingredients
Main Ingredients
- 2 pounds boneless, skinless chicken breasts.
- 2 tablespoons avocado oil, divided.
- 1 large green bell pepper, thinly sliced.
- 1 large red bell pepper, thinly sliced.
- 1 large yellow onion, thinly sliced.
- 8 ounces white mushrooms, thinly sliced.
- 1 teaspoon kosher salt.
- 1 teaspoon garlic powder.
- 1 teaspoon smoked paprika.
- 1/2 teaspoon onion powder.
- 1/2 teaspoon freshly ground black pepper.
- 1 tablespoon Worcestershire sauce.
- 1 tablespoon unsalted butter.
- 8 ounces sliced provolone cheese, about 8 to 10 slices.
- 6 hoagie rolls or sub rolls.
- 2 tablespoons softened butter for toasting the rolls.
Optional Ingredients
- 1/2 teaspoon crushed red pepper flakes for extra heat.
- 1 jalapeno, thinly sliced.
- 1/4 cup mayonnaise.
- 2 tablespoons cheese sauce.
- 1 teaspoon Italian seasoning.
- Pickled hot peppers for serving.
- Extra provolone cheese for a cheesier sandwich.
Ingredient Substitutions
- Chicken breasts: Boneless, skinless chicken thighs work well and usually stay extra juicy.
- Avocado oil: Use canola oil or another neutral high-heat cooking oil.
- Provolone cheese: Substitute American cheese, mozzarella, Monterey Jack, or white American cheese.
- Hoagie rolls: Sub rolls, steak rolls, or sturdy French sandwich rolls are good alternatives.
- Mushrooms: Leave them out if your family does not like mushrooms.
- Worcestershire sauce: Use a small amount of low-sodium soy sauce for a different savory flavor.
Equipment Needed
- Blackstone griddle or another outdoor flat-top griddle.
- Griddle spatulas.
- Long-handled tongs.
- Instant-read meat thermometer.
- Large cutting board.
- Sharp chef’s knife.
- Measuring spoons.
- Small bowl for mixing seasonings.
- Large plate or prep tray.
- Griddle scraper.
- Melting dome or large heat-safe metal bowl, optional.
- Squeeze bottle for oil, optional.
- Disposable food-safe gloves, optional.
Step-by-Step Instructions
1. Prepare the Chicken and Vegetables
Place the chicken breasts on a cutting board and slice them into very thin strips, ideally about 1/4 inch thick. If the chicken feels too soft to slice neatly, place it in the freezer for about 20 to 30 minutes first. Slightly firm chicken is much easier to cut into thin pieces.
Thinly slice the green bell pepper, red bell pepper, onion, and mushrooms. Try to keep the pieces similar in thickness so they cook at roughly the same speed.
The chicken strips should be thin enough to cook quickly without becoming thick, chewy chunks.
Do not cut the chicken into large cubes. Thin strips create a better texture for chicken Philly cheesesteak sandwiches.
2. Season the Chicken
In a small bowl, combine.
1 teaspoon kosher salt.
1 teaspoon garlic powder.
1 teaspoon smoked paprika.
1/2 teaspoon onion powder.
1/2 teaspoon black pepper.
Sprinkle the seasoning evenly over the sliced chicken and toss until every piece is lightly coated.
For the best flavor, season the chicken just before heading to the griddle.
3. Preheat the Blackstone Griddle
Preheat the Blackstone griddle over medium to medium-high heat for about 8 to 10 minutes. Aim for a surface temperature between 375°F and 400°F.
Add 1 tablespoon of avocado oil and spread it across one cooking zone.
If you have an infrared thermometer, use it to check the griddle surface. Burner knob positions can vary between griddle models and outdoor weather conditions.
Do not start cooking on a cold griddle. The chicken may release excess moisture and steam instead of developing flavorful browned edges.
4. Cook the Peppers, Onions, and Mushrooms
Add the sliced onion, bell peppers, and mushrooms to one side of the hot griddle. Drizzle with the remaining 1 tablespoon avocado oil.
Cook for 8 to 10 minutes, tossing and turning every 1 to 2 minutes with a spatula.
The vegetables are ready when.
The onions look soft and lightly golden.
The peppers are tender but still hold their shape.
The mushrooms have released most of their moisture.
Some pieces have lightly browned edges.
If the vegetables start browning too quickly before becoming tender, lower the heat slightly.
Avoid constantly moving the vegetables. Giving them brief contact with the hot griddle helps create better browning.
5. Cook the Seasoned Chicken
Move the vegetables to a cooler side of the griddle. Add the seasoned chicken to the hotter cooking zone and spread it into a single layer.
Let the chicken cook undisturbed for about 2 minutes. This short contact time helps the bottom develop light browning.
Use two griddle spatulas to flip, separate, and chop the chicken into smaller sandwich-size pieces. Continue cooking for another 4 to 6 minutes.
Add the Worcestershire sauce during the final 1 to 2 minutes of cooking.
The chicken should look opaque throughout with lightly golden-brown edges and no visible pink areas.
For food safety, chicken should reach a minimum internal temperature of 165°F when checked with an instant-read thermometer in the thickest pieces.
Do not overcrowd a small cooking zone. Crowded chicken releases moisture and can steam instead of sear.
6. Combine the Chicken and Vegetables
Add 1 tablespoon of butter to the cooked chicken. Move the peppers, onions, and mushrooms back toward the chicken.
Use your spatulas to toss everything together for 1 to 2 minutes.
Taste carefully and adjust the seasoning if needed. Keep in mind that the cheese will add additional saltiness.
The filling should look juicy and evenly mixed, but there should not be a large puddle of liquid on the griddle.
7. Divide the Filling Into Sandwich Portions
Separate the chicken and vegetable mixture into 6 even portions directly on the griddle.
Shape each portion into a line roughly matching the length of your hoagie rolls. This makes the sandwiches easier to assemble with less filling falling out.
8. Melt the Provolone Cheese
Place provolone slices over each portion of chicken and vegetables.
Allow the cheese to melt for 1 to 2 minutes. For faster melting, cover the portions with a melting dome. If needed, add a very small splash of water beside the food before covering to create steam.
Do not pour water directly onto the sandwiches or cheese.
The provolone should look soft, glossy, and fully draped over the chicken mixture.
9. Toast the Hoagie Rolls
Lightly spread softened butter on the cut sides of the hoagie rolls.
Place the rolls cut-side down on a clean section of the griddle. Toast for 1 to 2 minutes.
Check them frequently.
The inside surfaces should be lightly golden with crisp edges while the rolls remain soft enough to fold around the filling.
Hoagie rolls can burn quickly on a hot griddle. Do not walk away during this step.
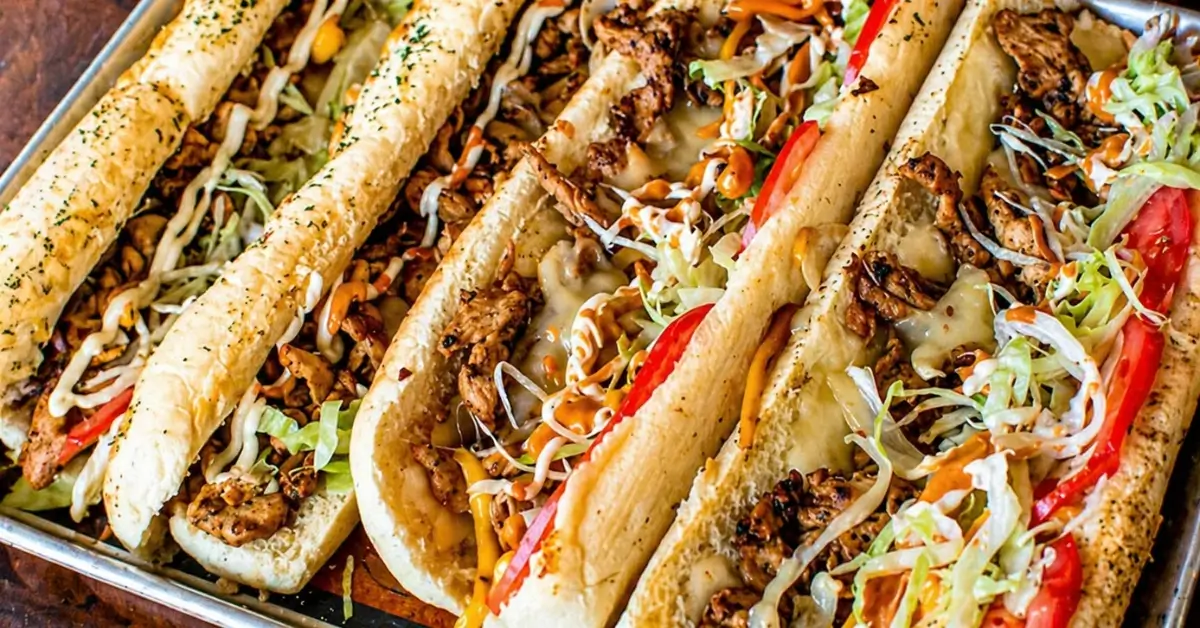
10. Assemble and Serve
Slide one cheesy portion of chicken, peppers, onions, and mushrooms into each toasted hoagie roll.
Add mayonnaise, hot peppers, jalapenos, or cheese sauce if desired.
Serve the Blackstone Chicken Philly Cheesesteak Sandwiches immediately while the filling is hot and the provolone is still melted.
For the best texture, avoid assembling the sandwiches too far ahead of time because the hot filling can gradually soften the toasted rolls.
Nutrition Facts
Cost To Make This Recipe
Item – Estimated Cost (USD).
2 lb chicken breasts – $8.50.
Bell peppers – $2.75.
Large yellow onion – $0.90.
8 oz mushrooms – $2.25.
Provolone cheese – $3.75.
6 hoagie rolls – $4.00.
Avocado oil – $0.45.
Butter – $0.40.
Worcestershire sauce – $0.20.
Seasonings – $0.45.
Estimated Total Recipe Cost
Approximately $23.65 USD.
Estimated Cost Per Serving
Approximately $3.94 USD per serving.
3. Blackstone Hibachi Fried Rice (Restaurant Style)
Ingredients
Main Ingredients
- 6 cups cold cooked long-grain white rice.
- 3 tablespoons avocado oil, divided.
- 3 large eggs.
- 1 small yellow onion, finely diced.
- 1 cup frozen peas and carrots, thawed.
- 3 tablespoons unsalted butter, divided.
- 3 cloves garlic, finely minced.
- 4 tablespoons low-sodium soy sauce.
- 1 tablespoon toasted sesame oil.
- 1 teaspoon grated fresh ginger.
- 1/2 teaspoon kosher salt, or to taste.
- 1/4 teaspoon ground black pepper.
- 3 green onions, thinly sliced.
Optional Ingredients
- 1 tablespoon oyster sauce for deeper savory flavor.
- 1 to 2 teaspoons teriyaki sauce for a slightly sweeter finish.
- 1/2 teaspoon garlic powder for extra garlic flavor.
- 1 teaspoon sesame seeds for garnish.
- 1/4 teaspoon crushed red pepper flakes for heat.
- 1 cup diced cooked chicken.
- 1 cup cooked shrimp.
- 1 cup diced cooked steak.
- Yum yum sauce for serving.
Ingredient Substitutions
- Rice: Long-grain white rice is ideal, but jasmine rice also works well. Brown rice can be used for a nuttier flavor and firmer texture.
- Avocado oil: Substitute canola oil, vegetable oil, or another neutral high-heat cooking oil.
- Soy sauce: Use tamari for a gluten-free alternative, but check every packaged ingredient if strict gluten avoidance is necessary.
- Butter: Salted butter works, but reduce the added kosher salt. A plant-based butter alternative can also be used.
- Fresh ginger: Substitute about 1/4 teaspoon ground ginger if fresh ginger is unavailable.
- Peas and carrots: A thawed frozen mixed vegetable blend works well. Avoid adding vegetables that release a large amount of water unless they are cooked separately first.
Important Rice Tip
- For the best Blackstone Hibachi Fried Rice (Restaurant Style), cook the rice ahead of time and refrigerate it until fully cold. Fresh, steaming rice contains too much moisture and can become sticky when tossed on the griddle.
- If you must use same-day rice, spread the cooked rice in a thin layer on a large sheet pan. Allow excess steam to escape, then chill it thoroughly before cooking.
Equipment Needed
- Blackstone flat-top griddle or similar outdoor flat-top grill.
- 2 metal griddle spatulas.
- Griddle scraper.
- Instant-read surface thermometer or infrared thermometer, optional but helpful.
- Large mixing bowl.
- Medium bowl for beating eggs.
- Measuring cups.
- Measuring spoons.
- Chef’s knife.
- Cutting board.
- Small whisk or fork.
- Silicone spatula, optional.
- Large serving bowl or platter.
- Heat-resistant gloves, optional.
- Oil squeeze bottle, optional but convenient.
Equipment Tip
- Two wide griddle spatulas make fried rice much easier to cook. You can lift, turn, spread, and toss the rice quickly without pushing it off the griddle.
Step-by-Step Instructions
Step 1: Prepare Everything Before Heating the Griddle
Measure all ingredients before you start cooking. Break up the cold rice with clean hands or a fork so there are no large compressed clumps.
Beat the eggs in a small bowl until the yolks and whites are combined. Dice the onion, mince the garlic, grate the ginger, and slice the green onions.
Fried rice cooks quickly. Once the ingredients hit the hot griddle, there is little time to stop and chop vegetables or measure sauces.
Do not place a solid block of refrigerated rice directly on the griddle. Breaking it apart first helps the rice heat evenly.
Step 2: Preheat the Blackstone Griddle
Preheat the Blackstone griddle over medium-high heat for about 8 to 10 minutes. Aim for a cooking surface temperature of approximately 375°F to 400°F.
Add about 1 tablespoon of avocado oil and spread it across the main cooking area.
The oil should look thin and glossy and move easily across the surface. It may shimmer slightly, but it should not smoke heavily.
A lukewarm griddle encourages the rice to steam instead of fry.
Step 3: Cook the Vegetables
Add the diced onion and thawed peas and carrots to one side of the griddle. Cook for 3 to 4 minutes, stirring and flipping regularly.
Add 1 tablespoon of butter, the minced garlic, and grated ginger. Cook for another 30 to 45 seconds.
The onion should look slightly translucent with a few golden edges. The peas and carrots should be hot and bright in color.
Garlic burns quickly on a hot flat-top. Add it near the end of the vegetable cooking time instead of at the beginning.
Step 4: Scramble the Eggs
Push the cooked vegetables to a cooler side of the griddle. Add about 1 teaspoon of oil to an open section, then pour on the beaten eggs.
Allow the eggs to sit for about 10 to 15 seconds before gently scrambling them with a griddle spatula. Cook for approximately 1 minute.
The eggs should be softly set with no visible liquid remaining.
Chop the eggs into small pieces with the edge of your spatula.
Do not overcook the eggs until dry and rubbery. They will continue cooking slightly when mixed with the hot rice.
Step 5: Fry the Cold Rice
Add the remaining avocado oil to the open cooking surface. Place the cold rice on the hot griddle and spread it into a relatively thin, even layer.
Leave the rice mostly undisturbed for 45 to 60 seconds. This direct contact helps create lightly toasted edges.
Flip and toss the rice with two spatulas. Continue cooking for 3 to 4 minutes.
The rice should be steaming hot, loose, and separated. Some grains may develop small golden-brown toasted spots.
Do not continuously stir from the first second. The rice needs short periods of direct contact with the griddle to develop better texture.
Step 6: Add Butter and Seasonings
Add the remaining 2 tablespoons of butter to the rice. Toss until the butter melts and lightly coats the grains.
Drizzle the low-sodium soy sauce across the rice rather than pouring it all into one spot. Add the toasted sesame oil, black pepper, and optional oyster sauce.
Toss quickly for 1 to 2 minutes.
The rice should have an even light-brown color with no dark pools of sauce.
Start cautiously with salt. Soy sauce already contains substantial sodium, and different brands vary considerably.
Too much soy sauce can make fried rice wet, overly salty, and heavy.
Step 7: Combine Everything
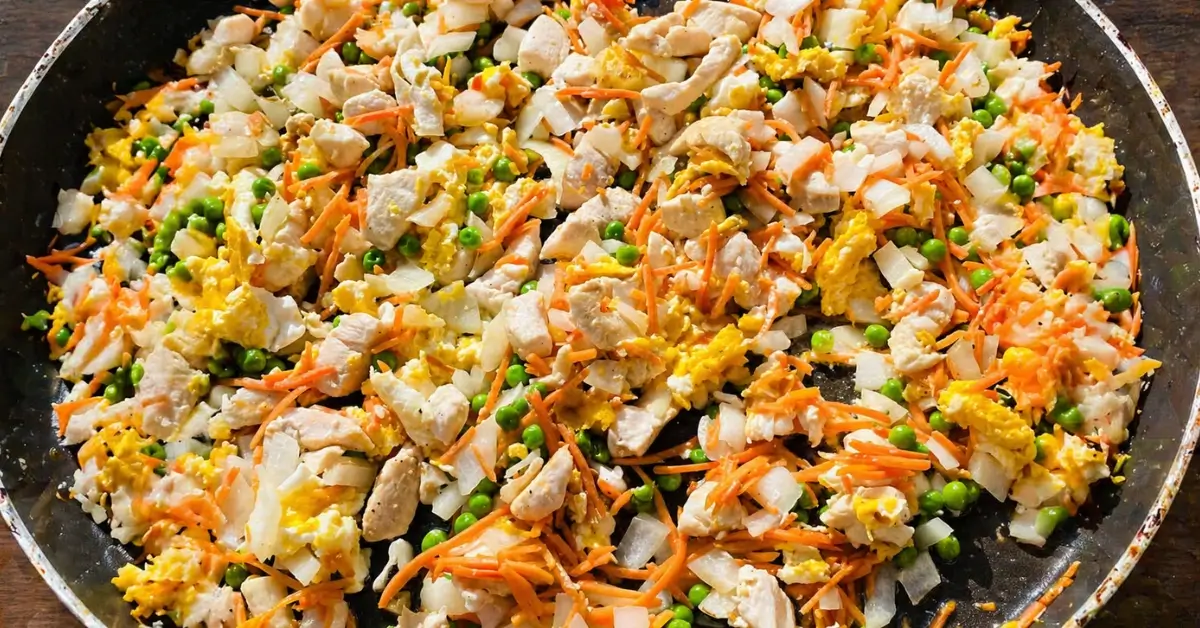
Mix the cooked vegetables and scrambled eggs into the seasoned rice.
Use both spatulas to fold and toss everything together for about 1 to 2 minutes. Add most of the sliced green onions, reserving a small amount for garnish.
If using fully cooked chicken, shrimp, or steak, add it now and toss until heated through. For food safety, previously cooked leftovers should be reheated thoroughly; 165°F is a practical target.
The vegetables and egg pieces should be evenly distributed throughout the rice.
Step 8: Taste and Finish
Taste a small spoonful carefully. Add a little more soy sauce only if needed.
Cook for another 30 to 60 seconds, then turn off the heat. Transfer the fried rice to a large serving bowl and top with the remaining green onions.
Serve immediately while hot.
Proper Blackstone Hibachi Fried Rice (Restaurant Style) should be buttery and savory with separate grains, tender vegetables, soft pieces of egg, and a few lightly crisp toasted edges. It should not look wet or gummy.
Nutrition Facts
Cost To Make This Recipe
Item – Estimated Cost (USD).
Long-grain white rice – $1.75.
Avocado oil – $0.70.
Eggs – $1.25.
Yellow onion – $0.50.
Frozen peas and carrots – $1.25.
Unsalted butter – $0.90.
Fresh garlic – $0.25.
Low-sodium soy sauce – $0.55.
Toasted sesame oil – $0.35.
Fresh ginger – $0.20.
Green onions – $0.85.
Salt and black pepper – $0.15.
Estimated Total Recipe Cost
Approximately $8.70 USD.
Estimated Cost Per Serving
Approximately $1.45 USD per serving.
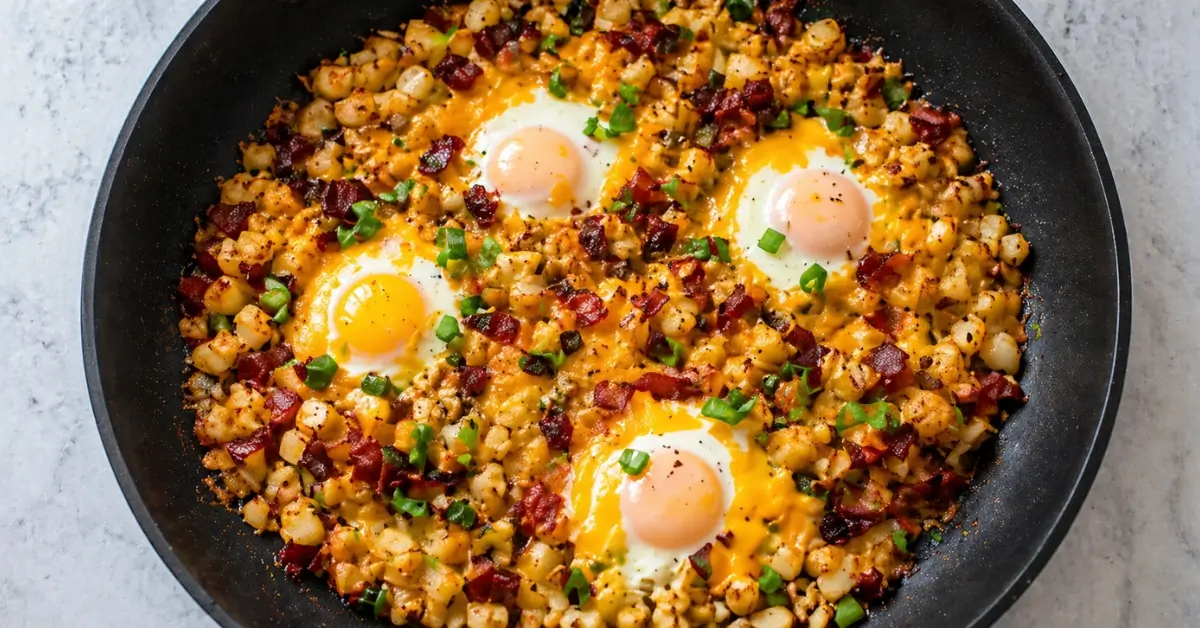
4. Blackstone Breakfast Hash With Eggs & Bacon
Ingredients
Main Ingredients
- 1 1/2 pounds russet potatoes, scrubbed and cut into 1/2-inch cubes.
- 8 ounces thick-cut bacon, chopped into 1-inch pieces.
- 6 large eggs.
- 1 medium yellow onion, diced.
- 1 medium red bell pepper, diced.
- 1 medium green bell pepper, diced.
- 1 cup shredded sharp cheddar cheese.
- 2 tablespoons avocado oil, divided.
- 1 teaspoon kosher salt, plus more to taste.
- 1/2 teaspoon black pepper.
- 1 teaspoon garlic powder.
- 1/2 teaspoon smoked paprika.
- 2 tablespoons sliced green onions, for serving.
Optional Ingredients
- 1 small jalapeno, finely diced, for extra heat.
- 1/2 teaspoon crushed red pepper flakes.
- 1/2 cup diced ham.
- 1/2 pound breakfast sausage, cooked and crumbled.
- 1 avocado, sliced for serving.
- Hot sauce, for serving.
- Salsa, for serving.
- Sour cream, for serving.
- Fresh chopped parsley or cilantro, for garnish.
Ingredient Substitutions
- Russet potatoes: Yukon Gold potatoes work well and have a naturally creamy center. Frozen diced hash brown potatoes can also save prep time, but cook them according to package guidance and expect the timing to vary.
- Bacon: Turkey bacon can be used, although it releases less fat and may require extra oil on the griddle.
- Avocado oil: Canola oil or another neutral high-heat cooking oil works well.
- Cheddar cheese: Monterey Jack, Colby Jack, pepper Jack, or a Mexican-style cheese blend are good alternatives.
- Bell peppers: Use any color you have available.
- Eggs: You can cook them sunny-side up, over-easy, scrambled, or to your preferred doneness.
Equipment Needed
- Blackstone flat-top griddle or similar outdoor flat-top grill.
- 2 sturdy metal griddle spatulas.
- Griddle scraper.
- Instant-read surface thermometer, optional but helpful.
- Large cutting board.
- Sharp chef’s knife.
- Large mixing bowl.
- Measuring cups.
- Measuring spoons.
- Small bowl for cracking eggs.
- Heat-resistant tongs.
- Basting dome or large metal bowl, optional.
- Oil squeeze bottle, optional.
- Paper towels.
- Serving platter or individual plates.
Step-by-Step Instructions
1. Prep All the Ingredients
Cut the potatoes into uniform 1/2-inch cubes. Keeping the pieces close to the same size is important because uneven potatoes cook at different speeds.
Dice the onion and bell peppers. Chop the bacon into roughly 1-inch pieces. Shred the cheese if you are using a block.
In a large bowl, toss the potatoes with.
1 tablespoon avocado oil.
1 teaspoon kosher salt.
1/2 teaspoon black pepper.
1 teaspoon garlic powder.
1/2 teaspoon smoked paprika.
Have every ingredient ready before heating the griddle. Flat-top cooking moves quickly once the surface is hot.
Do not cut the potatoes into large chunks. Oversized pieces may burn outside before becoming tender inside.
2. Preheat the Blackstone Griddle
Preheat the griddle to medium or medium-high heat, aiming for a surface temperature around 375°F.
Create two heat zones if your griddle allows it.
One medium-high zone for potatoes and bacon.
One medium or medium-low zone for vegetables and eggs.
Add a light coating of the remaining avocado oil where needed.
The cooking surface should look lightly glossy. A potato piece placed on the hot surface should begin sizzling within a few seconds.
Do not immediately turn every burner to maximum heat. Excessive heat can scorch the potatoes and bacon before they cook through.
3. Start Cooking the Potatoes
Spread the seasoned potatoes over the medium-high section of the griddle in a mostly single layer.
Leave them untouched for 3 to 4 minutes. This contact time allows a golden crust to form.
Flip the potatoes with a metal spatula, then continue cooking. Turn them every few minutes so multiple sides become browned.
If the potatoes are browning too quickly while still firm inside, lower the heat slightly. You can also add 1 to 2 tablespoons of water beside the potatoes and immediately cover them with a basting dome for 2 to 3 minutes. The trapped steam helps soften the centers.
The potatoes are ready when the outside is golden brown and crisp, while a fork slides easily into the center.
Do not constantly stir the potatoes. Too much movement prevents a proper crust from developing.
4. Cook the Bacon
Place the chopped bacon on an open section of the griddle.
Cook over medium heat, turning occasionally with a spatula or tongs. Allow the fat to slowly render.
As the bacon cooks, carefully move excess grease toward the griddle grease trap. Leave only a thin coating on the cooking surface for flavor.
The bacon should look browned with crisp edges. Remember that it may become slightly crisper after leaving the hottest part of the griddle.
Avoid cooking thick bacon over extreme heat. The outside can burn before enough fat renders.
5. Cook the Onion and Bell Peppers
Add the diced onion, red bell pepper, and green bell pepper to a medium-heat section of the griddle.
Cook while stirring occasionally.
The vegetables should soften while keeping a little texture.
The onion will become translucent with lightly browned edges. The peppers should look glossy and slightly tender.
If using jalapeno, add it during the final 2 to 3 minutes of vegetable cooking.
6. Combine the Breakfast Hash
Move the crispy potatoes, cooked bacon, onions, and bell peppers together.
Use two spatulas to toss and fold everything until evenly combined. Spread the mixture across the griddle and let it cook undisturbed for another 2 minutes.
This short final sear creates additional browned edges.
Taste one potato and adjust the seasoning if necessary.
Be careful with extra salt. Bacon and cheddar cheese already contain significant sodium.
7. Add the Cheese
Reduce the heat to medium-low.
Sprinkle 1 cup shredded sharp cheddar cheese evenly over the hot breakfast hash.
Let it melt for 1 to 2 minutes. For faster melting, cover the hash briefly with a basting dome.
The cheese should look glossy, soft, and fully melted between the potatoes and bacon.
Do not leave shredded cheese directly on an extremely hot bare griddle surface. It can burn quickly.
8. Cook the Eggs
Move the hash to one side of the griddle and lower an open section to medium-low heat, approximately 300°F to 325°F.
Lightly grease the surface if needed.
Crack each egg into a small bowl first, then carefully slide it onto the griddle. This makes it easier to remove any shell fragments and reduces the chance of broken yolks.
For sunny-side-up eggs, cook for approximately 3 to 5 minutes. Cover with a basting dome during the final minute if the whites need help setting.
For over-easy eggs, flip carefully and cook for about 30 to 60 seconds longer.
For scrambled eggs, whisk the eggs first and cook them over medium-low heat, folding gently until softly set.
For fried eggs, the whites should be opaque and set. Cook eggs to your preferred doneness. For food-safety guidance, egg dishes can be cooked to 160°F.
Do not cook eggs on the hottest section of the griddle. High heat can create rubbery whites and burned bottoms.
9. Serve Immediately
Divide the hot breakfast hash among six plates.
Top each portion with one cooked egg, distributing any remaining egg as desired. Finish with sliced green onions.
Add optional toppings such as.
Hot sauce.
Salsa.
Sliced avocado.
Sour cream.
Fresh herbs.
Serve immediately while the potatoes are crisp, the cheese is melted, and the eggs are hot.
Nutrition Facts
Cost To Make This Recipe
Item – Estimated Cost (USD).
1 1/2 pounds russet potatoes – $1.80.
8 ounces thick-cut bacon – $4.00.
6 large eggs – $2.00.
1 yellow onion – $0.80.
1 red bell pepper – $1.50.
1 green bell pepper – $1.00.
1 cup shredded cheddar cheese – $2.00.
Avocado oil – $0.35.
Seasonings – $0.40.
Green onions – $0.75.
Estimated Total Recipe Cost
Approximately $14.60 USD.
Estimated Cost Per Serving
Approximately $2.43 USD per serving.
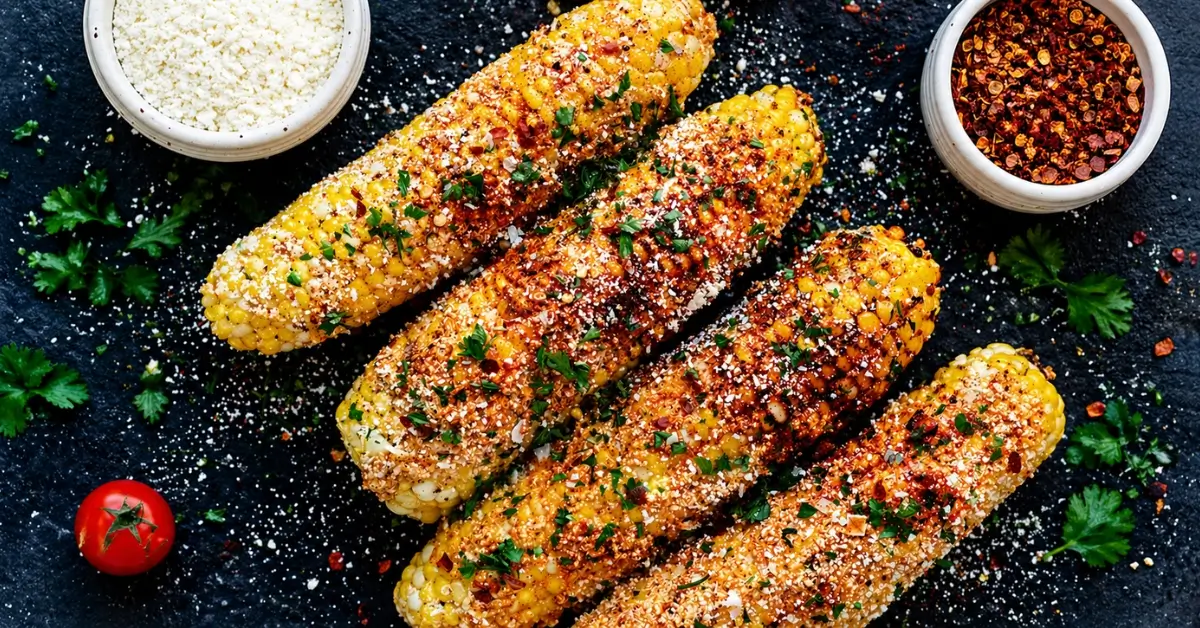
5. Blackstone Street Corn (Mexican Elote Style)
Ingredients
Main Ingredients
- 6 large ears fresh sweet corn, husks and silk removed.
- 1 tablespoon avocado oil or vegetable oil.
- 1/3 cup mayonnaise.
- 1/4 cup sour cream.
- 1 tablespoon fresh lime juice.
- 1 teaspoon finely grated lime zest.
- 1 small garlic clove, finely grated or minced.
- 1/2 teaspoon chili powder.
- 1/4 teaspoon smoked paprika.
- 1/4 teaspoon kosher salt, plus more to taste.
- 1/8 teaspoon black pepper.
- 1/2 cup crumbled cotija cheese.
- 2 tablespoons chopped fresh cilantro.
- 1 lime, cut into wedges for serving.
Optional Ingredients
- 1/8 to 1/4 teaspoon cayenne pepper for extra heat.
- 1/2 teaspoon Tajin seasoning for a tangy chile-lime finish.
- 1 tablespoon melted butter for a richer griddle flavor.
- 1 small jalapeno, finely diced.
- 2 tablespoons sliced green onions.
- Extra cotija cheese for topping.
- Hot sauce, for serving.
Ingredient Substitutions
- Cotija cheese: Use crumbled feta or finely grated Parmesan if cotija is unavailable.
- Sour cream: Plain full-fat Greek yogurt is a good substitute.
- Avocado oil: Use canola, vegetable, or another neutral high-heat cooking oil.
- Fresh corn: Use about 5 cups thawed frozen corn. Pat it very dry before cooking so it browns instead of steaming.
- Cilantro: Leave it out if you do not enjoy the flavor, or replace it with a small amount of chopped green onion.
- Chili powder: Ancho chile powder works well for a deeper, slightly smoky flavor.
Equipment Needed
- Blackstone griddle or similar outdoor flat-top griddle.
- Long-handled metal spatula.
- Griddle tongs.
- Sharp chef’s knife.
- Cutting board.
- Large mixing bowl.
- Small mixing bowl.
- Measuring cups.
- Measuring spoons.
- Whisk or fork.
- Citrus juicer, optional.
- Microplane or fine grater for lime zest.
- Basting brush, optional.
- Instant-read thermometer or infrared griddle thermometer, optional.
- Heat-resistant gloves, optional but helpful.
Step-by-Step Instructions
1. Prepare the Corn
Remove all husks and silk from the 6 ears of corn. Rinse only if needed, then dry the corn very well with clean paper towels.
A dry surface matters because excess water creates steam. Steam can prevent the corn from developing the browned, lightly blistered spots that give Blackstone street corn its signature griddle flavor.
Brush or rub the corn with 1 tablespoon avocado oil, coating each ear lightly.
The corn should look lightly glossy, not dripping with oil.
Do not put soaking-wet corn on a hot griddle. It can splatter and will usually steam before it chars.
2. Preheat the Blackstone Griddle
Preheat the Blackstone griddle over medium-high heat for about 5 to 8 minutes, aiming for a surface temperature of 400°F to 425°F.
If your griddle has multiple heat zones, keep one area slightly cooler. This gives you a safe place to move the corn if it begins browning too quickly.
An infrared thermometer is convenient, but not required. The griddle should be hot enough for the corn to sizzle within a few seconds of touching the surface.
Avoid extreme heat. A surface that is too hot may scorch the kernels before the corn becomes tender.
3. Make the Creamy Elote Sauce
While the griddle heats, add the following to a small bowl.
1/3 cup mayonnaise.
1/4 cup sour cream.
1 tablespoon lime juice.
1 teaspoon lime zest.
1 small grated garlic clove.
1/2 teaspoon chili powder.
1/4 teaspoon smoked paprika.
1/4 teaspoon kosher salt.
1/8 teaspoon black pepper.
Whisk until smooth and evenly combined. Taste the sauce and adjust the salt or lime juice if needed.
For more heat, stir in cayenne pepper or a little hot sauce.
The sauce should be smooth, creamy, and easy to spread. If it feels unusually thick, stir in another 1 teaspoon lime juice.
4. Cook the Corn on the Griddle
Place the oiled ears of corn directly on the preheated griddle. Leave some space between each ear so you can turn them easily.
Cook for 12 to 16 minutes, turning the corn about every 2 to 3 minutes with tongs. The exact cooking time depends on the size and freshness of the ears.
Do not keep the corn moving constantly. Short periods of direct contact with the hot griddle create better browning.
The corn is ready when the kernels look brighter and tender, with scattered deep golden-brown and lightly charred spots on several sides.
If one side darkens too fast, move the corn to a cooler griddle zone and continue cooking.
Do not chase a completely blackened exterior. Elote-style corn should have flavorful charred patches, not burned kernels.
5. Let the Corn Rest Briefly
Transfer the cooked corn to a clean tray or cutting board and let it rest for about 2 minutes.
This short rest makes the ears easier to handle while keeping them hot enough for the sauce and cheese to cling well.
Do not leave the corn sitting for 10 minutes or longer before dressing it. The creamy coating adheres best while the corn is still warm.
6. Coat With the Elote Sauce
Use a spoon or basting brush to spread the creamy sauce over each warm ear of corn. Turn the ears as you work so the coating reaches all sides.
You may use all the sauce for a generously coated result or apply a thinner layer and serve the remaining sauce on the side.
Each ear should have an even creamy coating without thick clumps of sauce.
Apply the sauce after cooking rather than directly on the hot griddle. Mayonnaise-based sauce can separate, scorch, and create unnecessary sticking when exposed to high griddle heat.
7. Add Cotija Cheese and Fresh Toppings
Sprinkle the coated corn generously with 1/2 cup crumbled cotija cheese and 2 tablespoons chopped cilantro.
Rotate each ear while adding the cheese so it sticks to multiple sides. Add extra chili powder, smoked paprika, or Tajin if desired.
The finished corn should look creamy and lightly speckled with red seasoning, with plenty of crumbly white cheese clinging to the surface.
8. Serve Immediately
Serve Blackstone Street Corn (Mexican Elote Style) warm with fresh lime wedges.
Squeeze lime juice over the corn just before eating. The acidity brightens the rich mayonnaise mixture and balances the salty cotija cheese.
For easier serving at cookouts, cut each ear in half after griddling and before adding the sauce and toppings. This creates smaller portions that are easier for guests and kids to handle.
Nutrition Facts
Cost To Make This Recipe
Item – Estimated Cost (USD).
6 ears fresh sweet corn – $4.00.
Mayonnaise – $0.70.
Sour cream – $0.50.
Cotija cheese – $2.25.
Fresh lime – $0.75.
Fresh cilantro – $0.45.
Garlic – $0.10.
Oil and seasonings – $0.50.
Estimated Total Recipe Cost
Approximately $9.25 USD.
Estimated Cost Per Serving
Approximately $1.54 USD per serving.
6. Blackstone Garlic Butter Shrimp With Lemon

Ingredients
Main Ingredients
- 1 1/2 pounds large raw shrimp, peeled and deveined, tails on or off.
- 4 tablespoons unsalted butter, divided.
- 1 tablespoon olive oil.
- 5 garlic cloves, finely minced.
- 2 tablespoons fresh lemon juice.
- 1 teaspoon lemon zest.
- 1 teaspoon smoked paprika.
- 1/2 teaspoon kosher salt.
- 1/2 teaspoon black pepper.
- 1/4 teaspoon red pepper flakes.
- 2 tablespoons fresh parsley, finely chopped.
- 1 lemon, cut into wedges for serving.
Optional Ingredients
- 1/2 teaspoon Cajun seasoning for extra savory heat.
- 1 tablespoon grated Parmesan cheese for a richer finish.
- 1 tablespoon chopped fresh chives for garnish.
- 1 extra tablespoon butter for a more buttery sauce.
- 1/4 teaspoon cayenne pepper for additional spice.
Ingredient Substitutions
- Shrimp: Medium or jumbo shrimp can be used. Adjust cooking time based on size.
- Unsalted butter: Salted butter works too, but reduce the added kosher salt.
- Olive oil: Avocado oil is a good substitute and handles griddle heat well.
- Fresh garlic: Use about 1 1/2 teaspoons garlic powder if fresh garlic is unavailable. The flavor will be less sharp and aromatic.
- Fresh lemon juice: Bottled lemon juice can work in a pinch, but fresh lemon gives better flavor.
- Fresh parsley: Chopped cilantro or chives can be substituted.
Equipment Needed
- Blackstone griddle or similar flat-top outdoor griddle.
- Long-handled metal spatula.
- Griddle scraper.
- Instant-read thermometer, optional but helpful.
- Large mixing bowl.
- Small bowl for the garlic butter mixture.
- Measuring cups.
- Measuring spoons.
- Sharp chef’s knife.
- Cutting board.
- Microplane or fine grater for lemon zest.
- Citrus juicer, optional.
- Paper towels.
- Serving platter or large plate.
- Heat-resistant gloves, optional.
Step-by-Step Instructions
Step 1: Prepare the Shrimp
Place the peeled and deveined shrimp on a plate lined with paper towels. Pat them thoroughly dry on all sides.
Transfer the shrimp to a large mixing bowl. Add.
1 tablespoon olive oil.
1 teaspoon smoked paprika.
1/2 teaspoon kosher salt.
1/2 teaspoon black pepper.
1/4 teaspoon red pepper flakes.
Toss gently until every shrimp is lightly coated.
The shrimp should look evenly seasoned with no large wet spots at the bottom of the bowl.
Dry shrimp brown better. Excess moisture creates steam and can prevent the shrimp from developing lightly seared edges.
Do not leave the raw shrimp sitting in lemon juice before cooking. Acid can begin changing the shrimp’s texture and may make the surface less pleasant.
Step 2: Make the Lemon Garlic Butter
In a small bowl, combine.
3 tablespoons softened or melted unsalted butter.
5 minced garlic cloves.
2 tablespoons fresh lemon juice.
1 teaspoon lemon zest.
Stir until combined. Keep the mixture near the griddle so it is ready to use.
Preparing the butter mixture before the shrimp hit the griddle matters because the cooking process moves quickly.
Step 3: Preheat the Blackstone Griddle
Preheat the Blackstone griddle over medium heat until the cooking surface reaches approximately 375–400°F.
Allow about 5–10 minutes for proper preheating, depending on your griddle model and outdoor conditions.
Add the remaining 1 tablespoon butter to the cooking surface and spread it over the shrimp cooking area.
The butter should melt and gently sizzle. If it immediately turns dark brown or smokes heavily, the griddle is too hot.
Avoid extreme high heat. Garlic and butter can burn quickly, creating a bitter flavor.
Step 4: Cook the First Side of the Shrimp
Arrange the seasoned shrimp in a single layer on the hot griddle.
Cook for approximately 1 1/2–2 minutes without constantly moving them.
Leave a little space between the shrimp whenever possible.
The bottom edges should develop light browning, and the shrimp should begin changing from translucent gray to opaque pink and white.
If your griddle is crowded, cook the shrimp in two batches. Overcrowding traps moisture and encourages steaming instead of searing.
Step 5: Flip the Shrimp
Use a metal spatula to flip the shrimp.
Cook the second side for about 1–2 minutes.
Properly cooked shrimp become opaque and usually curl into a loose C shape. Shrimp curled into a very tight circle are often overcooked.
For food safety, cook shrimp to an internal temperature of 145°F.
Do not walk away from the griddle. Large shrimp can go from tender to rubbery in a short amount of time.
Step 6: Add the Garlic Butter Mixture
Reduce the heat slightly if the griddle surface appears extremely hot.
Add the prepared lemon garlic butter mixture around and over the shrimp. Toss continuously with the spatula for about 30–60 seconds.
This short cooking time allows the garlic to become fragrant without burning.
The butter should bubble lightly, the garlic should smell aromatic, and the shrimp should appear glossy.
Do not let minced garlic sit untouched on a very hot griddle. Burned garlic tastes bitter and can overpower the entire recipe.
Step 7: Finish and Serve
Remove the shrimp from the griddle as soon as they are opaque and reach 145°F.
Transfer them immediately to a serving platter. Sprinkle with.
2 tablespoons chopped fresh parsley.
Additional lemon zest, if desired.
Fresh lemon wedges for squeezing.
Taste before adding extra salt.
Serve Blackstone Garlic Butter Shrimp With Lemon immediately while the shrimp are hot, juicy, and coated in the warm garlic butter.
They pair well with.
Steamed white rice.
Garlic bread.
Grilled asparagus.
Blackstone vegetables.
Buttered pasta.
Baked potatoes.
Warm tortillas.
Fresh green salad.
Nutrition Facts
Cost To Make This Recipe
Item – Estimated Cost (USD).
1 1/2 lb large raw shrimp – $13.50.
Unsalted butter – $0.75.
Olive oil – $0.20.
Fresh garlic – $0.45.
Fresh lemons – $1.50.
Fresh parsley – $0.75.
Smoked paprika – $0.15.
Kosher salt – $0.03.
Black pepper – $0.08.
Red pepper flakes – $0.06.
Estimated Total Recipe Cost
Approximately $17.47 USD.
Estimated Cost Per Serving
Approximately $4.37 USD per serving.
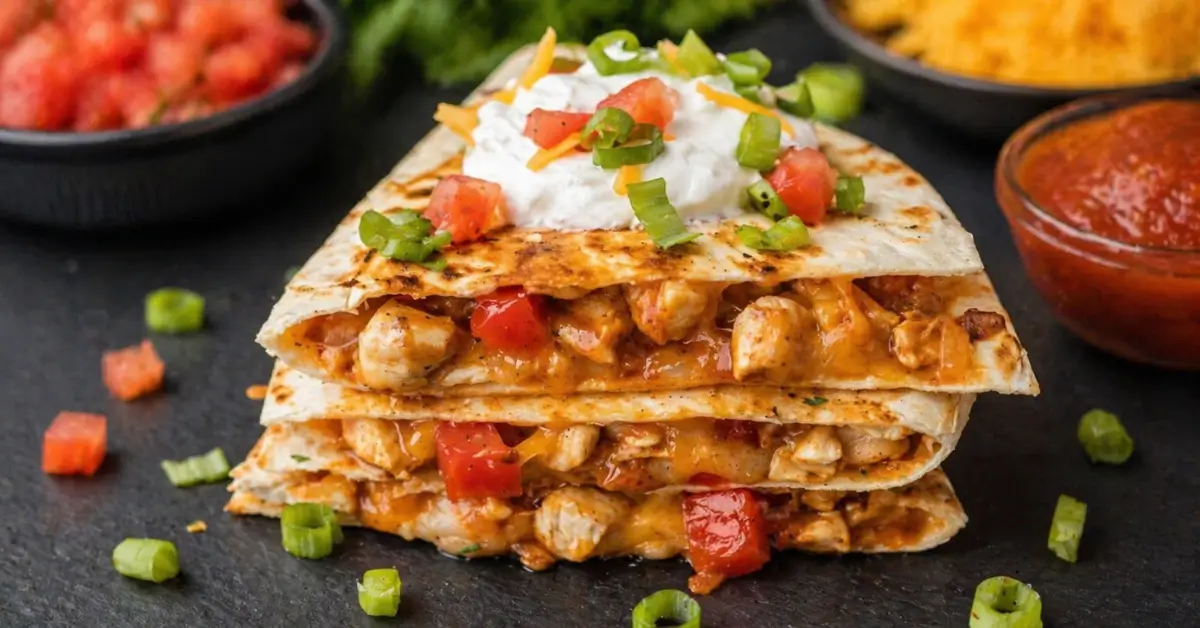
7. Blackstone Loaded Quesadillas (Chicken Or Beef)
Ingredients
For the Chicken or Beef
Choose one protein option.
Chicken Option
- 1 1/2 pounds boneless, skinless chicken thighs or chicken breasts.
- 1 tablespoon avocado oil or vegetable oil.
- 2 teaspoons chili powder.
- 1 teaspoon ground cumin.
- 1 teaspoon smoked paprika.
- 1 teaspoon garlic powder.
- 1/2 teaspoon onion powder.
- 3/4 teaspoon kosher salt.
- 1/4 teaspoon black pepper.
Beef Option
- 1 1/2 pounds lean ground beef, preferably 85/15 or 90/10.
- 2 teaspoons chili powder.
- 1 teaspoon ground cumin.
- 1 teaspoon smoked paprika.
- 1 teaspoon garlic powder.
- 1/2 teaspoon onion powder.
- 3/4 teaspoon kosher salt.
- 1/4 teaspoon black pepper.
For the Vegetables
- 1 medium yellow onion, thinly sliced.
- 1 red bell pepper, thinly sliced.
- 1 green bell pepper, thinly sliced.
- 1 tablespoon avocado oil or vegetable oil.
- 1/4 teaspoon kosher salt.
For the Loaded Quesadillas
- 6 large burrito-size flour tortillas, about 10 inches each.
- 3 cups shredded Mexican-style cheese blend.
- 1 cup canned black beans, drained and rinsed well.
- 1 cup corn kernels, drained if canned or thawed if frozen.
- 1/2 cup salsa, plus more for serving.
- 2 tablespoons avocado oil, vegetable oil, or melted butter for the griddle.
- 2 tablespoons chopped fresh cilantro.
Optional Ingredients
- 1 jalapeno, thinly sliced.
- 1/2 cup pickled jalapenos.
- 1/2 cup sliced black olives.
- 1 small avocado, diced.
- 1/2 cup sour cream.
- 1/2 cup guacamole.
- Pico de gallo, for serving.
- Hot sauce, for serving.
- Lime wedges, for serving.
- 2 sliced green onions.
- Extra shredded cheese for an even cheesier filling.
Equipment Needed
- Blackstone griddle or similar outdoor flat-top griddle.
- Long metal griddle spatula.
- Second spatula for easier flipping.
- Instant-read meat thermometer.
- Sharp chef’s knife.
- Cutting board.
- Large mixing bowl.
- Small bowl for seasoning.
- Measuring cups.
- Measuring spoons.
- Tongs.
- Griddle scraper.
- Paper towels.
- Serving platter.
- Pizza cutter or sharp knife for slicing.
Step-by-Step Instructions
1. Preheat the Blackstone Griddle
Preheat your Blackstone griddle over medium heat to about 350°F to 375°F. Allow it to heat for roughly 5 to 8 minutes.
A properly heated griddle should make a small drop of water sizzle and evaporate quickly. Avoid blasting the griddle on high heat. Tortillas can burn before the cheese has enough time to melt.
Starting with an extremely hot cooking surface. Medium heat gives you better control and more evenly golden quesadillas.
2. Prepare the Ingredients
While the griddle heats, slice the onion and bell peppers into thin, similar-size strips. Drain and rinse the black beans, prepare the corn, shred the cheese if needed, and have all toppings ready.
If using chicken, cut it into small bite-size pieces, about 1/2 to 3/4 inch. Smaller pieces cook faster and spread more evenly through each quesadilla.
Keep raw chicken and ready-to-eat ingredients on separate plates and use separate utensils to prevent cross-contamination.
3. Season the Chicken or Beef
For chicken, place the pieces in a bowl with 1 tablespoon oil, chili powder, cumin, smoked paprika, garlic powder, onion powder, salt, and black pepper. Toss until every piece is lightly coated.
For ground beef, combine the dry seasonings in a small bowl so they are ready to sprinkle evenly during cooking.
Seasoning the meat evenly matters more than adding a huge amount of spice. You want flavor throughout the filling, not random salty or spicy bites.
4. Cook the Chicken or Beef
If Using Chicken.
Lightly oil one section of the griddle. Spread the seasoned chicken in a single layer and let it cook undisturbed for about 2 to 3 minutes so it develops browning.
Flip and continue cooking for another 4 to 6 minutes, stirring occasionally. The chicken is done when the pieces are browned outside, opaque in the center, and reach an internal temperature of 165°F.
Total chicken cooking time is usually 7 to 9 minutes, depending on piece size and griddle temperature.
If Using Ground Beef.
Place the ground beef on the hot griddle and break it apart with a spatula. Sprinkle the seasoning mixture evenly over the meat.
Cook for about 7 to 9 minutes, turning and chopping the beef as it browns. It is ready when no pink remains and the meat reaches at least 160°F internally.
Push the cooked meat to a cooler side of the griddle.
Overcrowding the meat into a thick pile. Spread it out so it browns instead of steaming.
5. Cook the Peppers and Onions
Add 1 tablespoon oil to a clean section of the griddle. Add the sliced onion and bell peppers, then sprinkle with 1/4 teaspoon salt.
Cook for 5 to 7 minutes, tossing occasionally with a spatula.
The vegetables are ready when the onions look glossy and lightly golden and the peppers are tender but still have a little bite. For softer fajita-style vegetables, cook an additional 2 minutes.
Add the optional fresh jalapeno during the final 2 to 3 minutes if you want extra heat.
6. Combine the Filling
Mix the cooked chicken or beef with the sautéed peppers and onions directly on the griddle.
Add the black beans and corn. Cook everything together for 1 to 2 minutes, just until the beans and corn are heated through.
Taste carefully and adjust seasoning if necessary.
Keep the filling fairly dry. Excess liquid creates soggy tortillas and makes the quesadillas harder to flip.
7. Lower the Heat for Assembly
Reduce the griddle to medium-low or about 325°F to 350°F.
Scrape away any burned seasoning or food bits. Add a very light coating of oil or melted butter where the tortillas will cook.
This lower temperature is important because the cheese needs time to melt before the tortillas become too dark.
8. Assemble the Quesadillas
Lay the tortillas flat on the griddle. Work in batches if your griddle cannot comfortably fit all six.
On one half of each tortilla, add.
About 1/4 cup shredded cheese.
About 2/3 cup chicken or beef mixture.
1 to 2 tablespoons salsa.
Another 1/4 cup shredded cheese.
A small sprinkle of fresh cilantro.
Fold the empty half of the tortilla over the filling and press gently with a spatula.
Overfilling. A giant mound of meat and toppings may look tempting, but it makes the quesadilla difficult to flip and prevents even heating.
9. Cook Until Golden and Crispy
Cook the folded quesadillas for about 2 to 4 minutes on the first side.
Look for a golden-brown surface with crisp spots around the edges. Carefully flip using one wide spatula, or use two spatulas for better support.
Cook the second side for another 2 to 3 minutes.
The Blackstone Loaded Quesadillas (Chicken Or Beef) are ready when both sides are golden and crisp and the cheese inside is completely melted.
Gently press the center with your spatula. The quesadilla should feel hot and slightly flexible from the melted cheese, while the outside remains crisp.
10. Rest, Slice, and Serve
Transfer the finished quesadillas to a cutting board and let them rest for 2 minutes.
This short rest allows the melted cheese to settle slightly, helping the filling stay inside when sliced.
Cut each quesadilla into 3 or 4 wedges using a pizza cutter or sharp knife. Serve hot with sour cream, guacamole, salsa, pico de gallo, lime wedges, or hot sauce.
Total Cook Time: About 20 minutes.
Nutrition Facts
Cost To Make This Recipe
Item – Estimated Cost (USD).
Chicken – $6.50.
Large flour tortillas – $3.00.
Shredded cheese – $4.50.
Bell peppers and onion – $3.50.
Black beans – $1.00.
Corn – $1.25.
Salsa – $1.50.
Oil and seasonings – $1.25.
Cilantro and basic garnishes – $1.50.
Estimated Total Recipe Cost
Approximately $24.00 USD.
Estimated Cost Per Serving
Approximately $4.00 USD per serving.
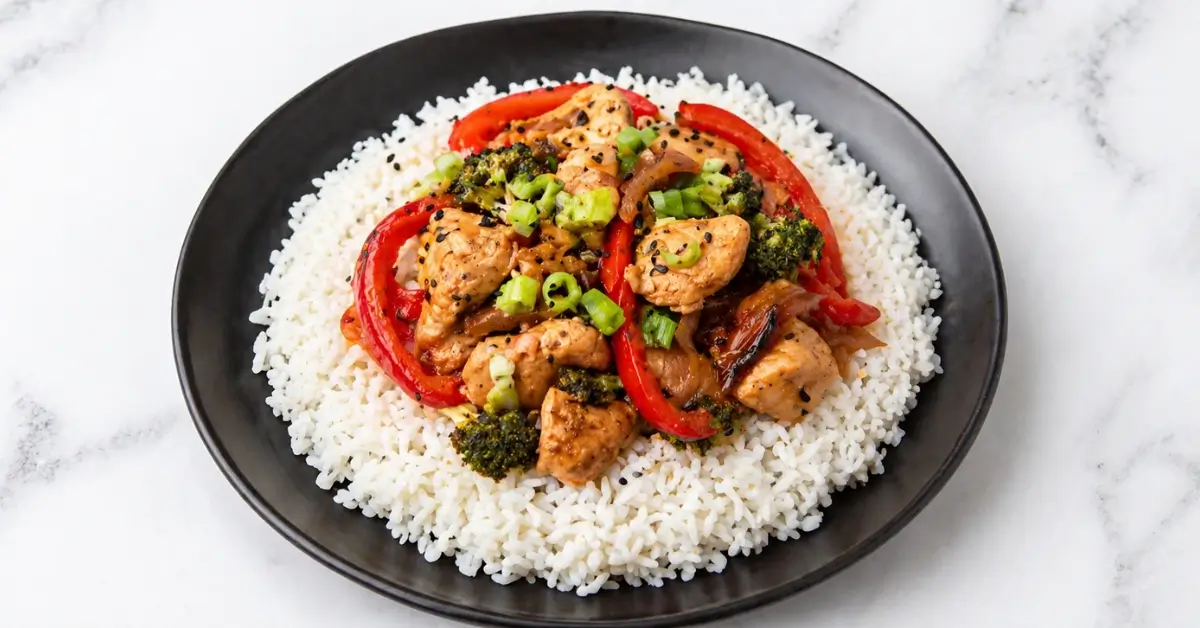
8. Blackstone Teriyaki Chicken Stir Fry
Ingredients
For the Chicken Stir Fry
- 2 pounds boneless, skinless chicken breasts, cut into 1-inch bite-size pieces.
- 2 tablespoons avocado oil, divided.
- 1 large red bell pepper, cut into 1-inch pieces.
- 1 large green bell pepper, cut into 1-inch pieces.
- 1 medium yellow onion, sliced.
- 2 cups broccoli florets, cut into small bite-size pieces.
- 1 medium zucchini, sliced into half-moons.
- 2 medium carrots, thinly sliced.
- 3 cloves garlic, minced.
- 1 teaspoon kosher salt.
- 1/2 teaspoon ground black pepper.
For the Teriyaki Sauce
- 1/2 cup low-sodium soy sauce.
- 1/4 cup packed light brown sugar.
- 2 tablespoons honey.
- 1 tablespoon rice vinegar.
- 1 tablespoon toasted sesame oil.
- 2 teaspoons fresh ginger, finely grated.
- 1 tablespoon cornstarch.
- 2 tablespoons cold water.
Optional Ingredients
- 2 green onions, thinly sliced, for garnish.
- 1 tablespoon sesame seeds, for garnish.
- 1/2 teaspoon crushed red pepper flakes, for heat.
- 1 cup sliced mushrooms.
- 1 cup drained pineapple chunks.
- Cooked white rice, brown rice, or noodles, for serving.
Ingredient Substitutions
- Chicken thighs: Use boneless, skinless chicken thighs instead of chicken breasts for richer flavor and extra juiciness.
- Avocado oil: Substitute canola oil or another neutral high-heat cooking oil.
- Low-sodium soy sauce: Regular soy sauce works, but the finished dish will contain more sodium and may taste noticeably saltier.
- Tamari: Use tamari as an alternative to soy sauce when appropriate for your dietary needs. Always check individual product labels.
- Brown sugar: Maple syrup can replace the brown sugar, although the sauce will have a slightly different flavor and consistency.
- Fresh ginger: Use about 1/2 teaspoon ground ginger if fresh ginger is unavailable.
- Rice vinegar: Apple cider vinegar can work in a pinch.
- Vegetables: Swap in snap peas, mushrooms, cabbage, asparagus, or extra bell peppers based on what you have.
Equipment Needed
- Blackstone griddle or similar outdoor flat-top griddle.
- Instant-read meat thermometer.
- 2 long-handled metal griddle spatulas.
- Griddle scraper.
- Cutting board.
- Sharp chef’s knife.
- Large mixing bowl.
- Medium mixing bowl.
- Small bowl or measuring cup.
- Whisk or fork.
- Measuring cups.
- Measuring spoons.
- Tongs, optional.
- Griddle dome or melting cover, optional.
- Heat-resistant gloves, optional but helpful.
Step-by-Step Instructions
1. Prepare the Chicken and Vegetables
Cut the chicken into roughly 1-inch pieces. Try to keep the pieces close to the same size so they cook evenly.
Pat the chicken dry with paper towels, then season it with the kosher salt and black pepper.
Cut the bell peppers, onion, broccoli, zucchini, and carrots before turning on the griddle. Keep the vegetables in a large bowl or on a clean prep tray.
The chicken pieces should look dry on the outside, not wet or dripping.
Do not cut some chicken pieces tiny and others very large. Uneven pieces can leave you with dry chicken and undercooked chicken in the same batch.
2. Make the Teriyaki Sauce
In a medium bowl, whisk together.
Low-sodium soy sauce.
Brown sugar.
Honey.
Rice vinegar.
Sesame oil.
Fresh ginger.
In a separate small bowl, stir the cornstarch and cold water together until completely smooth. This is your cornstarch slurry.
Set both mixtures aside.
Always combine cornstarch with cold water before adding it to hot sauce. Adding dry cornstarch directly to the griddle can create stubborn lumps.
3. Preheat the Blackstone Griddle
Preheat the Blackstone griddle over medium to medium-high heat for about 5 to 8 minutes. Aim for a surface temperature of approximately 375°F to 400°F.
Create two cooking zones if possible. Keep one side around medium-high heat for the chicken and another side at medium heat for the vegetables.
Add 1 tablespoon of avocado oil and spread it across the main cooking area.
The oil should look thin and glossy and move easily across the surface. It should not produce heavy smoke.
Do not run the entire griddle at maximum heat. Teriyaki sauce contains sugar and can scorch quickly on an excessively hot surface.
4. Cook the Chicken
Place the seasoned chicken pieces on the hot griddle in a single layer. Leave them undisturbed for about 2 minutes so the first side can brown.
Flip and toss the chicken with a metal spatula. Continue cooking for another 4 to 6 minutes, turning occasionally.
The chicken should have golden-brown spots and no raw pink appearance on the outside.
Check the thickest pieces with an instant-read thermometer. Chicken is safely cooked when the internal temperature reaches 165°F.
Move the cooked chicken to a cooler section of the griddle.
Do not overcrowd a small hot zone. Crowded chicken releases moisture and steams instead of developing flavorful browned edges.
5. Cook the Firm Vegetables First
Add the remaining 1 tablespoon avocado oil to the open cooking area.
Place the broccoli and carrots on the griddle first because they need more cooking time. Stir fry for about 2 to 3 minutes.
For softer broccoli, add 1 to 2 tablespoons water beside the vegetables and immediately cover them with a griddle dome for about 1 minute. The trapped steam helps soften the broccoli.
The broccoli should turn bright green, and the carrots should begin to soften while still holding their shape.
Avoid adding too much water. Excess water can cool the griddle and make the vegetables soggy.
6. Add the Remaining Vegetables
Add the red bell pepper, green bell pepper, onion, and zucchini.
Cook for 3 to 4 minutes, tossing frequently with the spatulas.
Add the minced garlic during the final 30 seconds of this stage.
The onions should look slightly translucent, the peppers should develop a few browned edges, and the zucchini should be tender but not mushy.
Adding garlic near the end prevents it from burning and becoming bitter.
7. Combine the Chicken and Vegetables
Move the cooked chicken back toward the vegetables. Toss everything together for about 30 to 60 seconds.
Spread the mixture into a loose, even layer.
The chicken and vegetables should be hot, lightly browned, and evenly distributed across the cooking area.
8. Add the Teriyaki Sauce
Whisk the teriyaki sauce again because some sugar may settle at the bottom.
Pour the sauce over the chicken and vegetables. Toss continuously for about 1 minute.
Stir the cornstarch slurry again, then add it gradually while tossing the stir fry. Cook for another 1 to 2 minutes.
The sauce is ready when it becomes glossy, lightly sticky, and coats the chicken and vegetables instead of running like thin liquid across the griddle.
Do not pour sugary teriyaki sauce onto an extremely hot, empty section of the griddle. It can burn before you have time to mix it into the food.
9. Taste and Finish
Taste a small piece after allowing it to cool slightly. Add crushed red pepper flakes if you want more heat.
Turn off the burners once the sauce has thickened. Garnish with sliced green onions and sesame seeds if desired.
Serve the Blackstone Teriyaki Chicken Stir Fry immediately with steamed white rice, brown rice, or noodles.
The finished stir fry should look glossy and colorful, with browned chicken edges and vegetables that remain vibrant rather than dull and overcooked.
Nutrition Facts
Cost To Make This Recipe
Item – Estimated Cost (USD).
2 lb chicken breasts – $8.50.
Bell peppers and onion – $3.50.
Broccoli – $2.00.
Zucchini and carrots – $1.75.
Garlic and fresh ginger – $1.00.
Soy sauce – $0.90.
Brown sugar and honey – $0.85.
Rice vinegar and sesame oil – $0.75.
Avocado oil – $0.55.
Cornstarch and seasonings – $0.30.
Estimated Total Recipe Cost
Approximately $20.10 USD.
Estimated Cost Per Serving
Approximately $3.35 USD per serving.
9. Blackstone Pancakes With Caramelized Bananas

Ingredients
For the Blackstone Pancakes
- 2 cups all-purpose flour.
- 2 tablespoons granulated sugar.
- 1 tablespoon baking powder.
- 1/2 teaspoon baking soda.
- 1/2 teaspoon salt.
- 2 large eggs.
- 1 3/4 cups whole milk.
- 1/4 cup unsalted butter, melted and slightly cooled.
- 1 teaspoon vanilla extract.
- 1 to 2 tablespoons neutral cooking oil or additional butter, for greasing the griddle.
For the Caramelized Bananas
- 3 medium ripe bananas, sliced into 1/2-inch rounds.
- 3 tablespoons unsalted butter.
- 1/3 cup packed light brown sugar.
- 1/2 teaspoon ground cinnamon.
- 1 teaspoon vanilla extract.
- 1 tablespoon water.
- Pinch of salt.
Optional Ingredients
- Pure maple syrup, for serving.
- Chopped pecans or walnuts.
- Whipped cream.
- Powdered sugar.
- Fresh berries.
- Mini chocolate chips.
- Pinch of ground nutmeg.
- 1 tablespoon heavy cream for a richer banana sauce.
Ingredient Substitutions
- Whole milk: You can use 2% milk or buttermilk. Buttermilk gives the pancakes a slightly tangier flavor and tender texture.
- All-purpose flour: A 1-to-1 gluten-free baking flour can work, although the final texture may be slightly different.
- Unsalted butter: Salted butter is fine. If using it, slightly reduce the added salt.
- Light brown sugar: Dark brown sugar works too and creates a deeper molasses flavor.
- Neutral cooking oil: Avocado oil, canola oil, or vegetable oil are all practical choices for a Blackstone griddle.
- Bananas: Use ripe yellow bananas with a few brown spots. Avoid extremely soft, heavily blackened bananas because they can turn mushy on the hot griddle.
Equipment Needed
- Blackstone griddle or similar flat-top outdoor griddle.
- Large mixing bowl.
- Medium mixing bowl.
- Whisk.
- Measuring cups.
- Measuring spoons.
- Rubber spatula.
- Griddle spatula or wide metal turner.
- Small knife.
- Cutting board.
- Small heat-safe bowl for melted butter.
- Ladle or 1/4-cup measuring cup for portioning pancake batter.
- Instant-read surface thermometer, optional but helpful.
- Paper towels.
- Serving plates.
Step-by-Step Instructions
1. Prepare the Pancake Batter
In a large mixing bowl, whisk together the all-purpose flour, granulated sugar, baking powder, baking soda, and salt.
In a separate medium bowl, whisk the eggs until blended. Add the whole milk, melted butter, and vanilla extract. Whisk again until combined.
Pour the wet ingredients into the dry ingredients. Gently stir with a rubber spatula just until no large pockets of dry flour remain.
The batter should look thick and slightly lumpy. That is exactly what you want.
Do not beat the batter until perfectly smooth. Overmixing develops too much gluten and can make pancakes chewy or tough instead of fluffy.
Let the batter rest for about 5 minutes while the Blackstone preheats.
2. Preheat the Blackstone Griddle
Set the Blackstone griddle to medium-low heat and preheat for about 5 to 8 minutes.
Aim for a cooking surface temperature of approximately 350°F to 375°F.
Lightly coat the pancake cooking area with a thin layer of neutral oil or butter.
The cooking surface is ready when a few drops of water sizzle briefly and evaporate without violently bouncing across the griddle.
Do not cook pancakes over very high heat. The outside can burn before the center has time to cook.
3. Portion the Pancakes
Use a 1/4-cup measuring cup or small ladle to pour portions of batter onto the hot griddle.
Leave about 2 inches of space between each pancake so you have enough room to flip them.
Cook the first side for approximately 2 to 3 minutes.
Look for bubbles forming across the surface. The outer edges should begin to look dry and set rather than glossy and wet.
Avoid pressing down on the pancakes with your spatula. Pressing squeezes out air and can make them dense.
4. Flip and Finish Cooking
Slide a wide griddle spatula completely underneath each pancake and flip it in one confident motion.
Cook the second side for another 1 to 2 minutes.
The pancakes are done when both sides are golden brown and the centers feel lightly springy when touched.
Transfer the cooked pancakes to a plate. Continue with the remaining batter, adding only a thin layer of oil or butter as needed.
If the pancakes become dark too quickly, lower the heat and allow the griddle temperature to settle before cooking the next batch.
5. Prepare the Bananas
While the final pancakes cook, peel the bananas and slice them into approximately 1/2-inch rounds.
Try to keep the slices similar in thickness so they cook evenly.
For the best texture, use ripe but still firm bananas. Very soft bananas can break apart when tossed in the caramel mixture.
6. Melt the Butter for the Caramelized Topping
Reduce one section of the griddle to low or medium-low heat. Aim for approximately 300°F to 325°F.
Add 3 tablespoons of unsalted butter to the griddle. Allow it to melt without letting it burn.
Sprinkle the brown sugar, cinnamon, and pinch of salt over the melted butter. Add 1 tablespoon of water.
Use the griddle spatula to gently stir the mixture for about 30 to 60 seconds.
The mixture should become glossy, bubbly, and syrup-like.
Brown sugar can scorch quickly on a hot flat-top. Keep this section of the griddle at a lower temperature than the pancake cooking area.
7. Caramelize the Bananas
Add the sliced bananas to the warm brown sugar mixture. Arrange them in a mostly single layer.
Cook for about 1 to 2 minutes on the first side, then gently turn the slices.
Cook for another 1 minute, just until the bananas are warm, lightly golden, and coated in the glossy caramel sauce.
Add the vanilla extract during the final 15 to 30 seconds of cooking and gently stir.
The bananas should look shiny and lightly browned while still holding their shape.
Do not cook them too long. Overcooked bananas can collapse into a soft mash.
8. Assemble and Serve
Stack 2 to 3 warm pancakes on each plate. Spoon the caramelized bananas and warm brown sugar sauce over the top.
Serve immediately while the pancakes are fluffy and the banana topping is still warm.
Add maple syrup only if desired. The caramelized banana topping is already sweet, so taste the pancakes first before adding extra syrup.
For more texture, finish with chopped pecans or walnuts. For a brunch-style presentation, add whipped cream and a light dusting of powdered sugar.
Nutrition Facts
Cost To Make This Recipe
Item – Estimated Cost (USD).
Flour, sugar, leavening, and salt – $0.90.
Eggs – $0.80.
Milk – $0.75.
Butter – $1.60.
Vanilla extract – $0.45.
Bananas – $0.90.
Brown sugar and cinnamon – $0.55.
Cooking oil – $0.20.
Estimated Total Recipe Cost
Approximately $6.15 USD.
Estimated Cost Per Serving
Approximately $1.54 USD per serving.
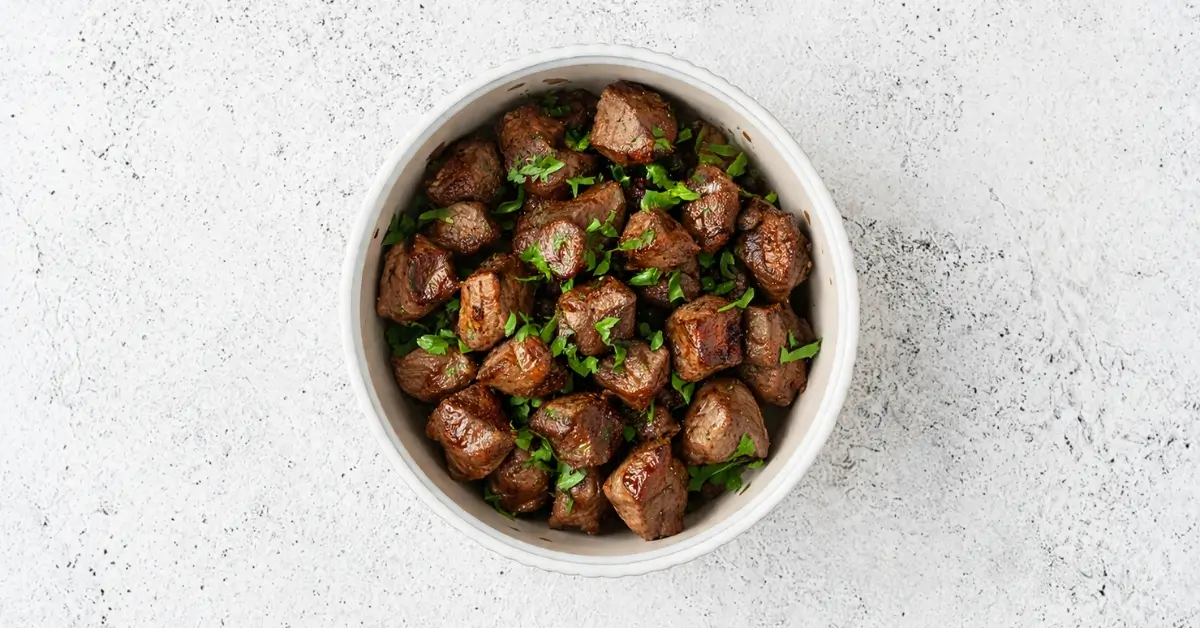
10. Blackstone Grilled Steak Bites With Herb Butter
Ingredients
For the Steak Bites
- 2 pounds top sirloin steak, trimmed and cut into 1-inch cubes.
- 1 tablespoon avocado oil.
- 1 teaspoon kosher salt.
- 1 teaspoon coarse black pepper.
- 1 teaspoon garlic powder.
- 1/2 teaspoon onion powder.
- 1/2 teaspoon smoked paprika.
For the Herb Butter
- 4 tablespoons unsalted butter, softened.
- 2 garlic cloves, finely minced.
- 1 tablespoon fresh parsley, finely chopped.
- 1 teaspoon fresh rosemary, finely chopped.
- 1 teaspoon fresh thyme leaves.
- 1 teaspoon fresh lemon juice.
- 1/4 teaspoon kosher salt.
Optional Ingredients
- 1/4 teaspoon red pepper flakes for mild heat.
- 1 tablespoon Worcestershire sauce for extra savory flavor.
- Lemon wedges for serving.
- Extra chopped parsley for garnish.
Equipment Needed
- Blackstone griddle or similar outdoor flat-top griddle.
- Instant-read meat thermometer.
- Sharp chef’s knife.
- Large cutting board.
- Large mixing bowl.
- Small mixing bowl.
- Measuring spoons.
- 2 sturdy metal griddle spatulas.
- Tongs.
- Paper towels.
- Small spoon or silicone spatula.
- Serving platter.
- Heat-resistant gloves, optional but helpful.
Step-by-Step Instructions
1. Prepare the Steak
Trim away any large pieces of tough connective tissue or excess hard fat. Cut the steak into roughly 1-inch cubes.
Try to keep the pieces close to the same size. Evenly sized steak bites cook at a similar rate, which helps prevent some pieces from becoming dry while others remain undercooked.
Pat the steak cubes very dry with paper towels.
This step matters more than many beginners expect. Wet steak releases steam on the griddle and can struggle to develop a dark brown crust.
Do not cut the steak into tiny pieces. Pieces much smaller than 1 inch can overcook before a good crust develops.
2. Make the Herb Butter
In a small bowl, combine.
4 tablespoons softened unsalted butter.
Minced garlic.
Chopped parsley.
Rosemary.
Thyme.
Lemon juice.
1/4 teaspoon kosher salt.
Mix until the herbs and garlic are evenly distributed throughout the butter.
Set the herb butter aside at room temperature while you cook the steak.
The finished butter should look creamy and evenly speckled with fresh green herbs.
Use softened butter, not fully melted butter. Soft butter blends with the herbs more evenly and is easier to add at the end of cooking.
3. Season the Steak Bites
Place the dry steak cubes in a large bowl. Add the avocado oil, kosher salt, black pepper, garlic powder, onion powder, and smoked paprika.
Toss until every piece is lightly and evenly coated.
If using Worcestershire sauce, add it sparingly. Too much liquid can reduce browning.
Do not leave heavily salted steak bites sitting for a long time after seasoning unless you are intentionally dry-brining them. For this quick recipe, season them shortly before cooking.
4. Preheat the Blackstone Griddle
Preheat the griddle over medium-high to high heat for about 8–10 minutes.
Aim for a surface temperature of approximately 425°F–475°F in the main cooking zone.
If you have an infrared thermometer, check the center area of the griddle. If not, look for a properly heated surface that quickly sizzles when a single steak cube touches it.
A fully preheated griddle is essential for a browned crust. Adding cold steak to a lukewarm surface often produces gray, watery steak bites.
5. Arrange the Steak in a Single Layer
Place the seasoned steak bites on the hot griddle in one even layer.
You should hear an immediate, strong sizzle.
Leave some space between the pieces. If your griddle is small, cook the steak in two batches.
Let the first side cook undisturbed for about 1 1/2–2 minutes.
The bottom should develop a deep brown crust before you turn the pieces.
Do not constantly stir or flip the steak. Frequent movement prevents proper searing.
6. Sear the Remaining Sides
Flip the steak bites with a metal spatula or tongs. Cook for another 1–2 minutes, then turn as needed to brown additional sides.
Depending on the size of the cubes and preferred doneness, the total cooking time will usually be around 5–8 minutes.
Use an instant-read thermometer to check the larger pieces. For food safety, the USDA-recommended minimum internal temperature for whole cuts of beef is 145°F followed by at least a 3-minute rest.
Because small steak cubes can rise in temperature quickly, watch them closely near the end.
Properly seared steak bites should have browned edges and a juicy center rather than a pale, wet exterior.
7. Add the Herb Butter
Reduce the heat to low or move the steak bites to a cooler section of the griddle.
Add the prepared herb butter over the hot steak. Toss for about 30–60 seconds, just until the butter melts and coats the pieces.
Add the butter near the end rather than at the beginning. Regular butter contains milk solids that can burn on a very hot griddle.
Do not leave minced garlic over intense heat for several minutes. Burned garlic can make the entire batch taste bitter.
8. Rest and Serve
Transfer the Blackstone Grilled Steak Bites With Herb Butter to a clean serving platter.
Let them rest for about 3 minutes before serving. This short rest allows the carryover cooking to finish and gives the steak a moment before it is eaten.
Spoon any remaining melted herb butter over the top. Garnish with extra parsley or serve with lemon wedges if desired.
Serve immediately while the steak bites are hot and the herb butter is still glossy.
Nutrition Facts
Cost To Make This Recipe
Item – Estimated Cost (USD).
2 lb top sirloin steak – $18.00.
Avocado oil – $0.30.
Seasonings – $0.50.
Unsalted butter – $0.75.
Fresh garlic – $0.20.
Fresh parsley – $0.50.
Fresh rosemary – $0.60.
Fresh thyme – $0.60.
Lemon juice – $0.15.
Estimated Total Recipe Cost
Approximately $21.60 USD.
Estimated Cost Per Serving
Approximately $5.40 USD per serving.